前言
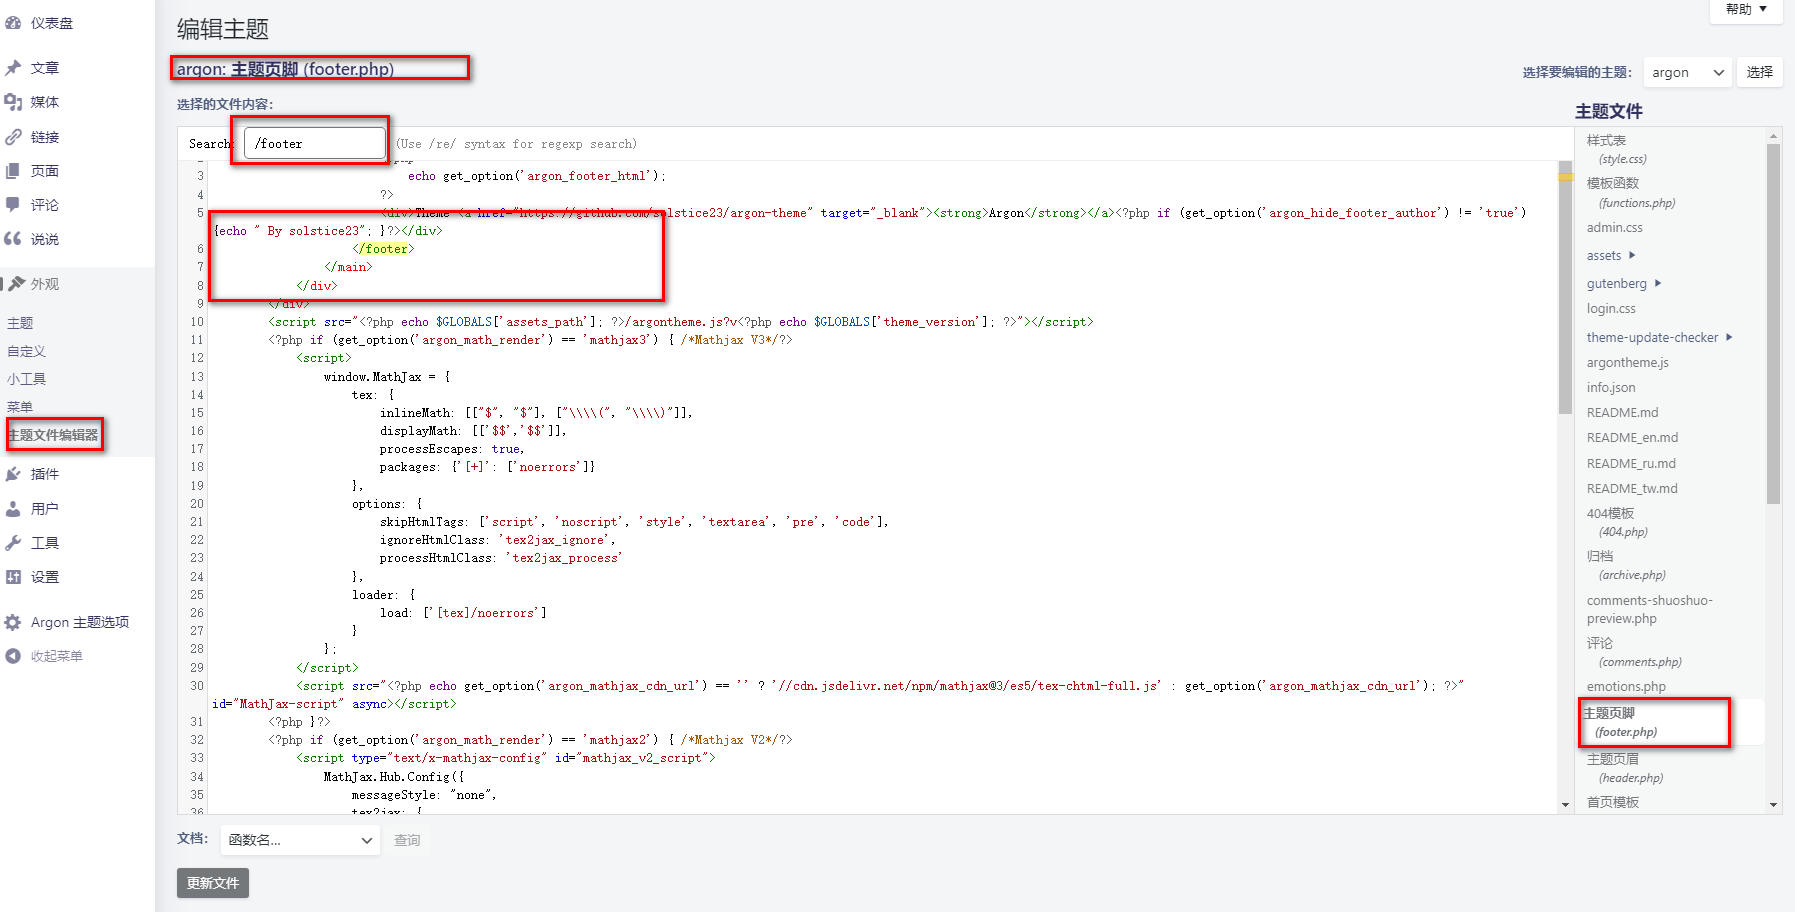
如果你编辑了某主题的footer.php,最好将该主题设置为手动更新。不然自动更新会将以前的设置覆盖掉!切记,切记!
经过Docker系列 WordPress系列 WordPress的菜单、Docker系列 WordPress系列 WordPress小工具、Docker系列 WordPress系列 WordPress页面三章的相关设置,其实你的博客已经有模有样了。推崇简洁的朋友可以不用再看这一章了。不过,总有一些人想玩点花样(比如我)。
大家可以将我和solstice23大佬的argon主题demo比较一下,我的博客会有很多特效!这些特效其实没有什么用途,主要是好看(颜狗实锤)。以后等自己新鲜劲过了,说不定都会关掉,不过目前还是有保留 (~ ̄▽ ̄)~
虽然我是以argon主题来示范,但对于多数主题来说应该有通用性(除了Argon主题点击概要也可以进入文章这一小节),因为它们多是基于CSS/JS/PHP——也就意味着如果你的博客平台支持CSS/JS/PHP,一般是可以用的。
我以前使用主题文件编辑器进行代码插入和修改。你登陆shell用vim也没问题,我以前就是用vim的。后来,我将特效相关代码用其它php文件托管,并通过VSCode管理,这也是一种优雅的方案。看个人习惯,没特别推荐。
此外,你也可以看一下鸦鸦大神的魔改教程,很多代码都非常有用呢!不过随着时间的积累,本文的内容应该已经秒杀各大argon配置教程了 (~ ̄▽ ̄)~ 还要什么自行车呀?冲鸭!
我的footer.php代码
这里备份一波,以免主题更新等不可抗力将代码搞掉了。懒人也可以直接复制我的代码使用。其中,https://bensz.hwb0307.top/bloghelper是我在DogeCloud里的专用链接;小伙伴们请用https://fastly.jsdelivr.net/gh/huangwb8/bloghelper@latest,这个链接是托管在Github中。
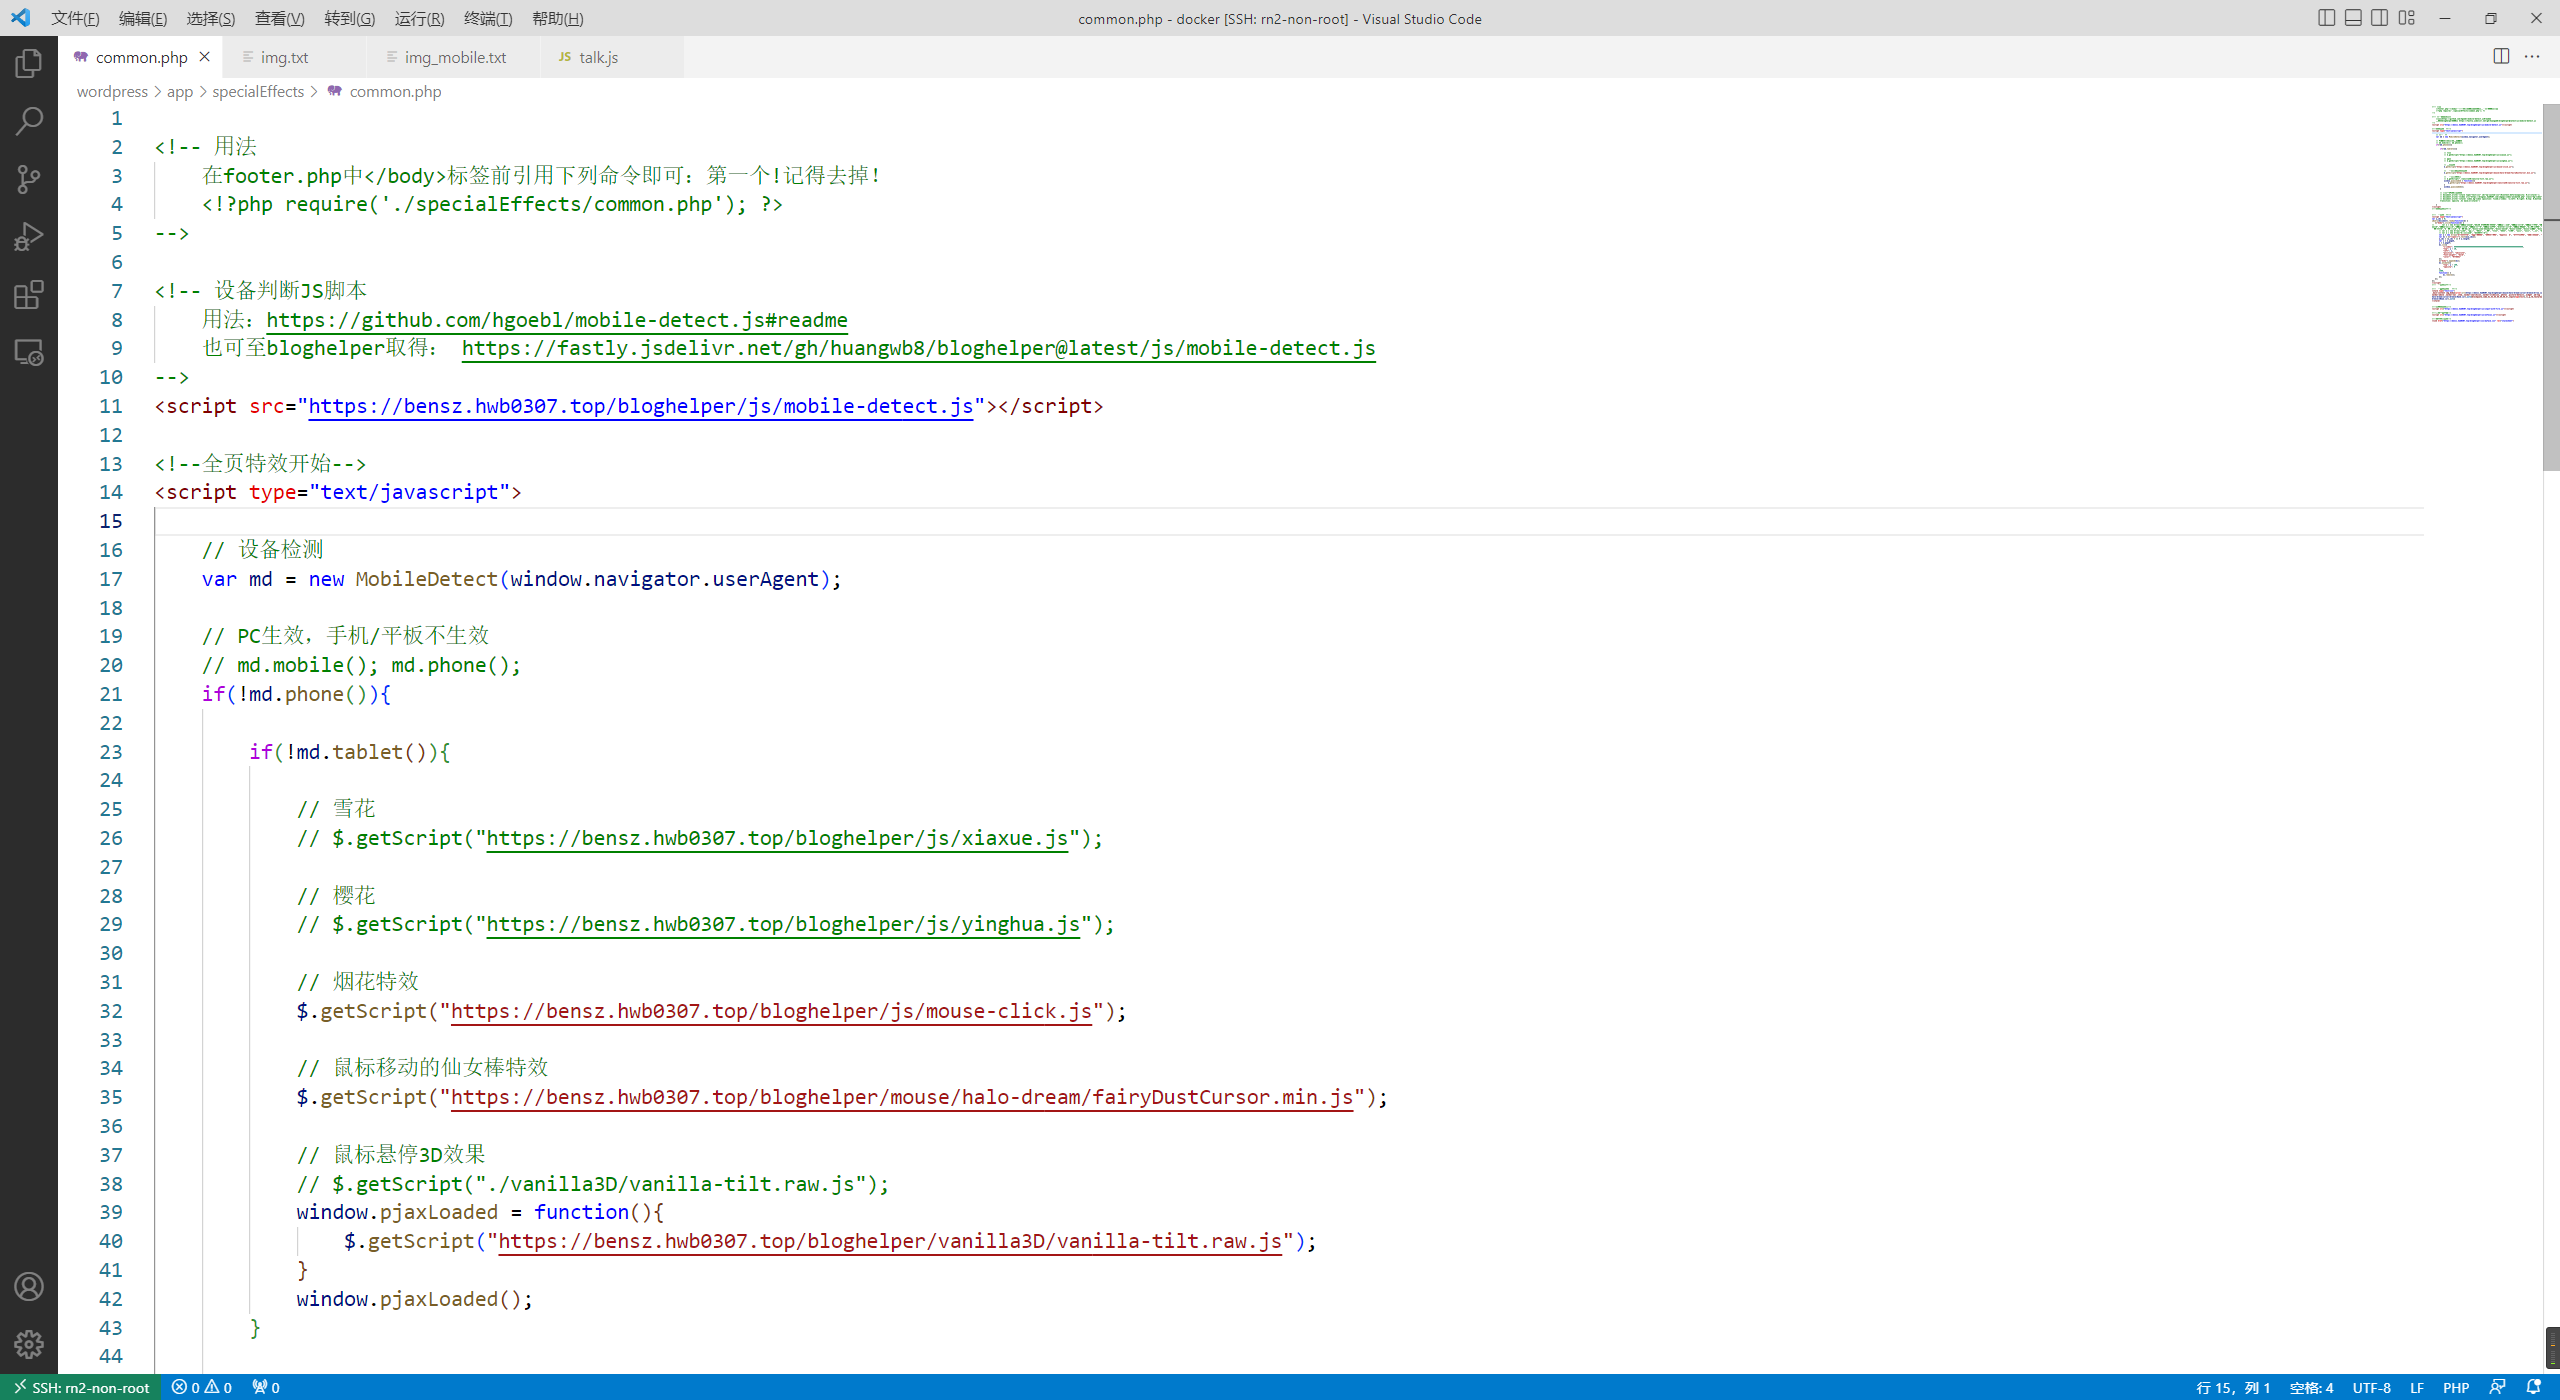
另外,我已经通过两个文件——common.php和timeRAM.php托管平时经常编辑的特效代码,这和直接在footer.php里添加是等价的。在footer.php引用的方法类似于:
我这样做的原因有两个:(1)分开托管逻辑比较清晰,源代码不容易因为更新丢失(我禁用了argon自动更新,其实还好);(2)我比较喜欢在VSCode里编辑代码。
如果你本地没什么好用的编辑器,还是直接在footer.php粘贴,然后在wordpress后台的主题编辑器里改动吧。
代码1
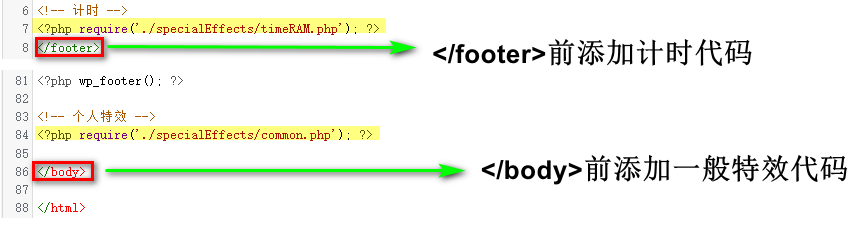
在</footer>标签之前的代码,即timeRAM.php的内容。
<!--耗时及占用内存开始-->
<span id="momk"></span><span id="momk" style="color: #ff0000;"></span>
<script type="text/javascript">
function NewDate(str) {
str = str.split('-');
var date = new Date();
date.setUTCFullYear(str[0], str[1] - 1, str[2]);
date.setUTCHours(0, 0, 0, 0);
return date;
}
function momxc() {
var birthDay =NewDate("2022-04-10");
var today=new Date();
var timeold=today.getTime()-birthDay.getTime();
var sectimeold=timeold/1000
var secondsold=Math.floor(sectimeold);
var msPerDay=24*60*60*1000; var e_daysold=timeold/msPerDay;
var daysold=Math.floor(e_daysold);
var e_hrsold=(daysold-e_daysold)*-24;
var hrsold=Math.floor(e_hrsold);
var e_minsold=(hrsold-e_hrsold)*-60;
var minsold=Math.floor((hrsold-e_hrsold)*-60); var seconds=Math.floor((minsold-e_minsold)*-60).toString();
document.getElementById("momk").innerHTML = "本站已安全运行:"+daysold+"天"+hrsold+"小时"+minsold+"分"+seconds+"秒<br>";
setTimeout(momxc, 1000);
}momxc();
</script>
<style>
#momk{animation:change 10s infinite;font-weight:800; }
@keyframes change{0%{color:#5cb85c;}25%{color:#556bd8;}50%{color:#e40707;}75%{color:#66e616;}100% {color:#67bd31;}}
</style>
<?php printf(' | 耗时 %.3f 秒 | 查询 %d 次 | 内存 %.2f MB |',timer_stop( 0, 3 ),get_num_queries(),memory_get_peak_usage() / 1024 / 1024);?><br>
<!--耗时及占用内存结束-->
代码2
在</body>标签之前的代码,即common.php的内容。
<!-- 用法
    在footer.php中</body>标签前引用下列命令即可:第一个!记得去掉!
    <!?php require('./specialEffects/common.php'); ?>
-->

<!-- 设备判断JS脚本
    用法:https://github.com/hgoebl/mobile-detect.js#readme
    也可至bloghelper取得: https://fastly.jsdelivr.net/gh/huangwb8/bloghelper@latest/js/mobile-detect.js
-->
<script src="https://bensz.hwb0307.top/bloghelper/js/mobile-detect.js"></script>

<!--全页特效开始-->
<script type="text/javascript">

    // 设备检测
    var md = new MobileDetect(window.navigator.userAgent);

    // PC生效,手机/平板不生效
    // md.mobile(); md.phone();
    if(!md.phone()){

        if(!md.tablet()){

            // 雪花
            // $.getScript("https://bensz.hwb0307.top/bloghelper/js/xiaxue.js");

            // 樱花
            // $.getScript("https://bensz.hwb0307.top/bloghelper/js/yinghua.js");

            // 小烟花特效
            // $.getScript("https://bensz.hwb0307.top/bloghelper/js/mouse-click.js");

            // 大烟花特效 z-index:217483647; pointer-events: none;
                $.getScript("https://fastly.jsdelivr.net/gh/huangwb8/bloghelper@latest/mouse/mouse-click-02/mouse-canvas.js");
            document.write('<style>#mouse-canvas {z-index:217483647; pointer-events: none;  box-sizing: border-box !important; display: block !important; position: fixed !important; left: 0; right: 0; top: 0; bottom: 0; width: 100%; height: 100vh;}</style>')

            // 鼠标移动的仙女棒特效
            // $.getScript("https://bensz.hwb0307.top/bloghelper/mouse/halo-dream/fairyDustCursor.min.js");

        }

        // 春节灯笼
        document.write('<link href="https://bensz.hwb0307.top/bloghelper/css/deng.css" rel="stylesheet">');
        document.write('<div class="deng-box"><div class="deng"><div class="xian"></div><div class="deng-a"><div class="deng-b"><div class="deng-t">春节</div></div></div><div class="shui shui-a"><div class="shui-c"></div><div class="shui-b"></div></div></div></div>');
        document.write('<div class="deng-box1"><div class="deng"><div class="xian"></div><div class="deng-a"><div class="deng-b"><div class="deng-t">快乐</div></div></div><div class="shui shui-a"><div class="shui-c"></div><div class="shui-b"></div></div></div></div>');

        // 随机图API之动态壁纸
        // document.write('<style type="text/css" id="wp-custom-css">#content:before{opacity: 0;}</style>');
        // document.write('<video src="https://blognas.hwb0307.com/imgapi/index-animated.php" class="bg-video" autoplay="" loop="loop" muted=""></video>');
        // document.write('<style> video.bg-video {position: fixed; z-index: -1;left: 0;right: 0;top: 0;bottom: 0;width: 100vw;height: 100vh; object-fit: cover;pointer-events: none;transition: opacity .3s ease;}</style>')
    }
</script>
<!--全页特效结束-->

<!--鼠标悬停3D效果start-->
<div class="article.post:not(.post-full)" data-tilt></div>
<div class=".shuoshuo-preview-container" data-tilt></div>
<script type="text/javascript" src="https://bensz.hwb0307.top/bloghelper/vanilla3D/vanilla-tilt_v1.7.3.js"></script>
<script type="text/javascript">
    // 设备检测
    var md = new MobileDetect(window.navigator.userAgent);

    // PC生效,手机/平板不生效
    // md.mobile(); md.phone();
    if(!md.phone() && !md.tablet()){
        window.pjaxLoaded = function(){
            // 正文卡片
            VanillaTilt.init(document.querySelectorAll("article.post:not(.post-full)"),{
                reverse:                true,  // reverse the tilt direction
                max:                    8,     // max tilt rotation (degrees)
                startX:                 0,      // the starting tilt on the X axis, in degrees.
                startY:                 0,      // the starting tilt on the Y axis, in degrees.
                perspective:            1000,   // Transform perspective, the lower the more extreme the tilt gets.
                scale:                  1.02,      // 2 = 200%, 1.5 = 150%, etc..
                speed:                  600,    // Speed of the enter/exit transition
                transition:             false,   // Set a transition on enter/exit.
                axis:                   "y",    // What axis should be banned. Can be "x", "y", or null
                reset:                  true,   // If the tilt effect has to be reset on exit.
                easing:                 "cubic-bezier(.03,.98,.52,.99)",    // Easing on enter/exit.
                glare:                  false,  // if it should have a "glare" effect
                "max-glare":            0.8,      // the maximum "glare" opacity (1 = 100%, 0.5 = 50%)
                "glare-prerender":      false,  // false = VanillaTilt creates the glare elements for you, otherwise
                                                // you need to add .js-tilt-glare>.js-tilt-glare-inner by yourself
                "mouse-event-element":  null,   // css-selector or link to HTML-element what will be listen mouse events
                gyroscope:              true,   // Boolean to enable/disable device orientation detection,
                gyroscopeMinAngleX:     -45,    // This is the bottom limit of the device angle on X axis, meaning that a device rotated at this angle would tilt the element as if the mouse was on the left border of the element;
                gyroscopeMaxAngleX:     45,     // This is the top limit of the device angle on X axis, meaning that a device rotated at this angle would tilt the element as if the mouse was on the right border of the element;
                gyroscopeMinAngleY:     -45,    // This is the bottom limit of the device angle on Y axis, meaning that a device rotated at this angle would tilt the element as if the mouse was on the top border of the element;
                gyroscopeMaxAngleY:     45,     // This is the top limit of the device angle on Y axis, meaning that a device rotated at this angle would tilt the element as if the mouse was on the bottom border of the element;
            })

            // 说说卡片
            // VanillaTilt.init(document.querySelectorAll(".shuoshuo-preview-container"),{
            //     reverse:                true,  // reverse the tilt direction
            //     max:                    5,     // max tilt rotation (degrees)
            //     startX:                 0,      // the starting tilt on the X axis, in degrees.
            //     startY:                 0,      // the starting tilt on the Y axis, in degrees.
            //     perspective:            2000,   // Transform perspective, the lower the more extreme the tilt gets.
            //     scale:                  1.02,      // 2 = 200%, 1.5 = 150%, etc..
            //     speed:                  300,    // Speed of the enter/exit transition
            //     transition:             false,   // Set a transition on enter/exit.
            //     axis:                   "y",    // What axis should be banned. Can be "x", "y", or null
            //     reset:                  true,   // If the tilt effect has to be reset on exit.
            //     easing:                 "cubic-bezier(.03,.98,.52,.99)",    // Easing on enter/exit.
            //     glare:                  false,  // if it should have a "glare" effect
            //     "max-glare":            0.8,      // the maximum "glare" opacity (1 = 100%, 0.5 = 50%)
            //     "glare-prerender":      false,  // false = VanillaTilt creates the glare elements for you, otherwise
            //                                     // you need to add .js-tilt-glare>.js-tilt-glare-inner by yourself
            //     "mouse-event-element":  null,   // css-selector or link to HTML-element what will be listen mouse events
            //     gyroscope:              true,   // Boolean to enable/disable device orientation detection,
            //     gyroscopeMinAngleX:     -45,    // This is the bottom limit of the device angle on X axis, meaning that a device rotated at this angle would tilt the element as if the mouse was on the left border of the element;
            //     gyroscopeMaxAngleX:     45,     // This is the top limit of the device angle on X axis, meaning that a device rotated at this angle would tilt the element as if the mouse was on the right border of the element;
            //     gyroscopeMinAngleY:     -45,    // This is the bottom limit of the device angle on Y axis, meaning that a device rotated at this angle would tilt the element as if the mouse was on the top border of the element;
            //     gyroscopeMaxAngleY:     45,     // This is the top limit of the device angle on Y axis, meaning that a device rotated at this angle would tilt the element as if the mouse was on the bottom border of the element;
            // })
        }
        $(window.pjaxLoaded);
        $(document).on('pjax:end', window.pjaxLoaded);
    }
</script>
<!--鼠标悬停3D效果end-->

<!--鼠标名单开始-->
<script type="text/javascript">
    var a_idx = 0;
    jQuery(document).ready(function($) {
    $("body").click(function(e) {
    //        var a = new Array("❤腿堡-苯苯❤","❤ALSO STARRING-榕榕❤","❤腿堡-亚伯❤","❤腿堡-银露❤","❤腿堡-枫叶❤","❤腿堡-培根❤","❤腿堡-老丘❤","❤腿堡-倩倩❤","❤腿堡-小o❤","❤腿堡-蛇蛇❤","❤腿堡-培根❤","❤腿堡-十九❤","❤腿堡-萝卜卜❤","❤腿堡-千泓❤","❤腿堡-萌波❤","❤腿堡-经历❤","❤letter-韩露❤","❤腿堡-记忆❤","❤叛徒-绝恋❤","❤腿堡-小离❤","❤腿堡-七秒❤","❤腿堡/剑花-U哥❤","❤大佬-幕哥❤","❤退谷-糕糕❤","❤退谷-肥鸡❤","❤退谷-气气❤","❤退谷-小幻❤","❤退谷-狂总❤","❤剑花-君故-会刷buff❤","❤剑花-肥少❤","❤剑花-太阳❤","❤剑花-我腿❤","❤剑花-笙哥❤","❤剑花-零点夫妇❤","❤还有很多小伙伴记不太清了❤");
        // var a = new Array("富强", "民主", "文明", "和谐", "自由", "平等", "公正", "法治", "爱国", "敬业", "诚信", "友善");
        // var a = new Array("❤为汝祈福❤", "❤早日康复❤");
        var a = new Array("❤身体健康❤", "❤万事如意❤", "❤心想事成❤", "❤笑口常开❤", "❤年年有余❤", "❤金榜题名❤", "❤前程似锦❤", "❤一帆风顺❤");
        var $i = $("<span/>").text(a[a_idx]);
        a_idx = (a_idx + 1) % a.length;
        var x = e.pageX,
        y = e.pageY;
        $i.css({
            "z-index": 999999999999999999999999999999999999999999999999999999999999999999999,
            // "z-index": -1,
            "top": y - 20,
            "left": x,
            "position": "absolute",
            "font-weight": "bold",
            "color": "#ff6651"
        });
        $("body").append($i);
        $i.animate({
            "top": y - 180,
            "opacity": 0
        },
        1500,
        function() {
            $i.remove();
        });
    });
    });
</script>
<!--鼠标名单结束-->

<!--鼠标指针特效2 开始-->
<style type="text/css">
    .main-content img,body{cursor:url(https://bensz.hwb0307.top/bloghelper/mouse/halo-dream/cursor/breeze/Arrow.cur),auto}.actions>div,.expand-done,.main-content figure>figcaption div,.navbar-above .navbar-nav .item,.navbar-searchicon,.navbar-slideicon,.photos .picture-details,.widget .ad-tag .click-close,a,button{cursor:url(https://bensz.hwb0307.top/bloghelper/mouse/halo-dream/cursor/breeze/Hand.cur),auto}blockquote,code,h1,h2,h3,h4,h5,h6,hr,input[type=text],li,p,td,textarea,th{cursor:url(https://bensz.hwb0307.top/bloghelper/mouse/halo-dream/cursor/breeze/IBeam.cur),auto}
</style>


<!--网站输入效果-->
<script src="https://bensz.hwb0307.top/bloghelper/js/input-with-fire.js"></script>

<!--主题搞笑字符-->
<!-- <script src="https://bensz.hwb0307.top/bloghelper/js/onfocus.js"></script> -->

<!--文字抖动特效-->
<link href="https://bensz.hwb0307.top/bloghelper/css/myface.css" rel="stylesheet">
运行时间、耗时及占用内存
我们可以在主题文件编辑器里编辑footer.php文件:
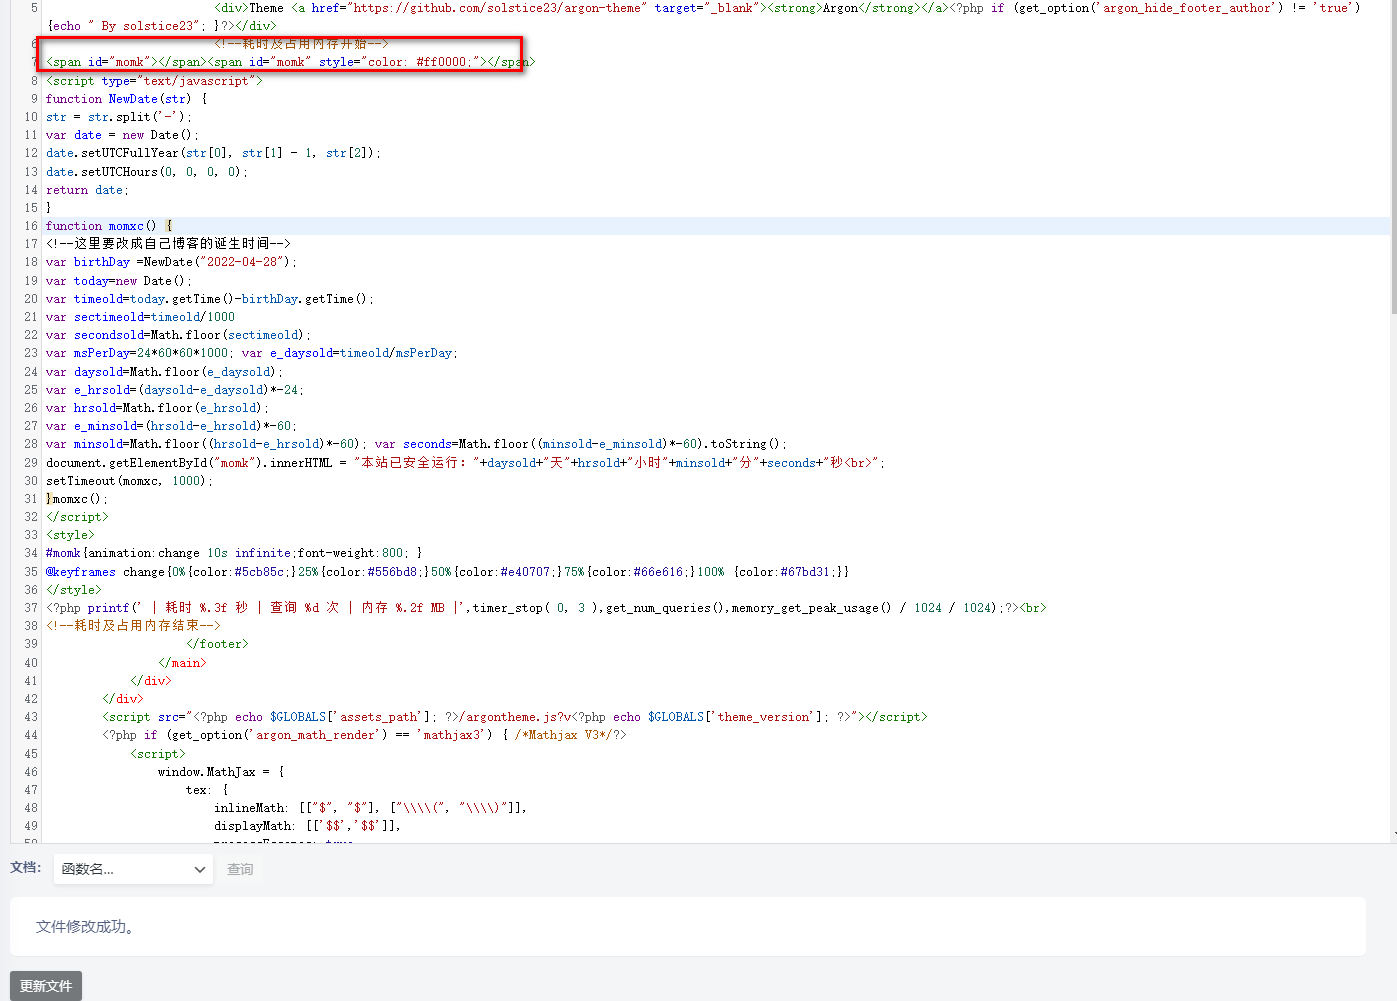
在</footer>之前插入以下代码。在var birthDay =NewDate("2022-04-28");这里,你修改成你自己的时间即可。应该没有强迫症纠结为什么不可以设置时分秒的吧!
<!--耗时及占用内存开始-->
<span id="momk"></span><span id="momk" style="color: #ff0000;"></span>
<script type="text/javascript">
function NewDate(str) {
str = str.split('-');
var date = new Date();
date.setUTCFullYear(str[0], str[1] - 1, str[2]);
date.setUTCHours(0, 0, 0, 0);
return date;
}
function momxc() {
<!--这里要改成自己博客的诞生时间-->
var birthDay =NewDate("2022-04-28");
var today=new Date();
var timeold=today.getTime()-birthDay.getTime();
var sectimeold=timeold/1000
var secondsold=Math.floor(sectimeold);
var msPerDay=24*60*60*1000; var e_daysold=timeold/msPerDay;
var daysold=Math.floor(e_daysold);
var e_hrsold=(daysold-e_daysold)*-24;
var hrsold=Math.floor(e_hrsold);
var e_minsold=(hrsold-e_hrsold)*-60;
var minsold=Math.floor((hrsold-e_hrsold)*-60); var seconds=Math.floor((minsold-e_minsold)*-60).toString();
document.getElementById("momk").innerHTML = "本站已安全运行:"+daysold+"天"+hrsold+"小时"+minsold+"分"+seconds+"秒<br>";
setTimeout(momxc, 1000);
}momxc();
</script>
<style>
#momk{animation:change 10s infinite;font-weight:800; }
@keyframes change{0%{color:#5cb85c;}25%{color:#556bd8;}50%{color:#e40707;}75%{color:#66e616;}100% {color:#67bd31;}}
</style>
<?php printf(' | 耗时 %.3f 秒 | 查询 %d 次 | 内存 %.2f MB |',timer_stop( 0, 3 ),get_num_queries(),memory_get_peak_usage() / 1024 / 1024);?><br>
<!--耗时及占用内存结束-->
差不多是这样,大家体会一下它的位置:
加完代码后,记得更新文件。这时去页面的下面看一下:

逼格拉满!
文字颤抖
效果大致如下:

源代码来自希卡米 | HiKami,我只是大佬代码的搬运工。大致的原理是定义一个.my-face class,然后直接在html中调用类的函数。首先,我们在footer.php中添加css脚本:
<!--文字抖动特效-->
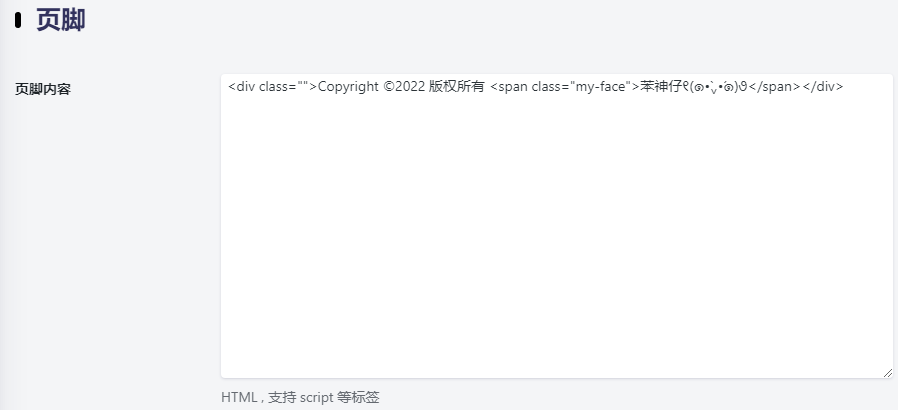
<link href="https://fastly.jsdelivr.net/gh/huangwb8/bloghelper@latest/css/myface.css" rel="stylesheet">然后,在页脚内容中添加类似命令(以Argon为例):
<div class=""><span class="my-face">Copyright ©2022 版权所有 苯神仔୧(๑•̀⌄•́๑)૭</span></div>
后台的填写类似于:
雪花/樱花/烟花特效
我这里提供的特效,在手机等设备是不生效的。因为手机的界面太小,特效会导致观看效果很差。设备判断主要利用mobile-detect项目提供的JS脚本(随机图API的php脚本也是类似的)。
用法也是编辑footer.php文件。还是刚刚那个界面。在末尾</body>上方(这样可以最后加载特效,以免影响其他内容的访问速度),添加以下代码(要用某个特效,记得将代码前面的注释符//去除):
<!--全页特效开始-->
<script src="https://fastly.jsdelivr.net/gh/huangwb8/bloghelper@latest/js/mobile-detect.js"></script>
<script type="text/javascript">
    // 设备检测
    var md = new MobileDetect(window.navigator.userAgent);

    // PC生效,手机/平板不生效
    // md.mobile(); md.phone();
    if(!md.phone()){
        if(!md.tablet()){
            // 雪花
            $.getScript("https://fastly.jsdelivr.net/gh/huangwb8/bloghelper@latest/js/xiaxue.js");

            // 樱花
            // $.getScript("https://fastly.jsdelivr.net/gh/huangwb8/bloghelper@latest/js/yinghua.js");

            // 小烟花特效
            // $.getScript("https://fastly.jsdelivr.net/gh/huangwb8/bloghelper@latest/js/mouse-click.js");

            // 大烟花特效
            $.getScript("https://fastly.jsdelivr.net/gh/huangwb8/bloghelper@latest/mouse/mouse-click-02/mouse-canvas.js");
            document.write('<style>#mouse-canvas {z-index:217483647; pointer-events: none;  box-sizing: border-box !important; display: block !important; position: fixed !important; left: 0; right: 0; top: 0; bottom: 0; width: 100%; height: 100vh;}</style>')
        }
    }
</script>
<!--全页特效结束-->
更新文件后生效。效果图如下:
- 雪花:这个特效还挺适合冬天用的!

- 樱花:截屏时比较小,所以显得比较密集。一般情况下还可以的。

其实,这个樱花的图片换成其它图片就会有不一样的效果。你替换img.src参数背后的数据(是16进制?)即可换成另外一种图片。比如,我偶然发现有个博主的效果是满屏咸鱼,很秀,哈哈(最近看的时候发现已经取消了)!

鼠标大烟花特效:
z-index和position参数决定了特效在哪一层显示,可按需修改。
鼠标小烟花特效:
卡片3D特效
卡片的3D特效如下图:
这个特效我非常喜欢,太酷了!
基本原理大概是定义一个函数,它有多个参数可以调整某个对象的位置、角度等属性,然后通过JS调用。在Argon主题中,所有的卡片都来自.card类。所以,如果你使用VanillaTilt.init(document.querySelectorAll(".card"),那么所有的卡片都会动起来。不过,我只需要让文章卡片article.post:not(.post-full)和说说卡片.shuoshuo-preview-container动起来,所以仅定义了这两个对象的运作。您也可以自定义其它对象,这个就不展开说明了。
具体脚本我已经搬过来了:
<!--鼠标悬停3D效果start-->
<!--1.定义对象属性(似乎没生效)-->
<div class="article.post:not(.post-full)" data-tilt></div>
<div class=".shuoshuo-preview-container" data-tilt></div>
<!--2.JS脚本-->
<script type="text/javascript" src="https://fastly.jsdelivr.net/gh/huangwb8/bloghelper@latest/vanilla3D/vanilla-tilt.js"></script>
<!--3.动作-->
<script type="text/javascript">
    // 设备检测。依赖前述mobile-detect项目。
    var md = new MobileDetect(window.navigator.userAgent);

    // PC生效,手机/平板不生效
    // md.mobile(); md.phone();
    if(!md.phone() && !md.tablet()){
        window.pjaxLoaded = function(){
            // 正文卡片
            VanillaTilt.init(document.querySelectorAll("article.post:not(.post-full)"),{
                reverse:false,  // 是否反转倾斜方向
                max:2,     // 最大的倾斜角度(度)
                startX:0,      // X轴上的起始倾斜,单位为度。
                startY:0,      // Y轴上的起始倾斜,单位为度。
                perspective:1000,   // 转换角度,越低倾斜越极端
                scale:1.02,      // 缩放比例,2 = 200%, 1.5 = 150%, 等等..
                speed:300,    // 进入/退出 过渡的速度
                transition:true,   // 是否在进入/退出的时候设置过渡效果
                axis:"y",   // 设置禁用哪个轴的反转,值为"x"或者"y"或者null
                reset:true,   // 设置在退出时清除倾斜效果
                easing:"cubic-bezier(.03,.98,.52,.99)",    // 设置进入退出时过渡的贝塞尔曲线
                glare:true,// 设置是否拥有炫光效果,即透明度渐变效果
                "max-glare":0.7,      // 设置最大的透明效果,1=100%,0.5=50%
                "glare-prerender":false,  // false, VanillaTilt为你创建透明炫光元素,否则你需要自己在.jstilt-glare>.js-tilt-glare-inner中自己添加render函数
                "mouse-event-element":null,   // css选择器或者链接到HTML的元素,他将监听该元素上的鼠标事件
                "full-page-listening":false,  // 是否监听整个页面的鼠标移动事件,若为true,他将监听这个页面,而非选中元素
                gyroscope:false,   // 是否开启陀螺仪的方向检测
                gyroscopeMinAngleX: 0,  //陀螺仪最小角度X
                gyroscopeMaxAngleX: 0,  //陀螺仪最大角度X
                gyroscopeMinAngleY: 0,  //陀螺仪最小角度
                gyroscopeMaxAngleY: 0,  //陀螺仪最大角度
                gyroscopeSamples: 10  //陀螺仪样品
            })

            // 说说卡片
            VanillaTilt.init(document.querySelectorAll(".shuoshuo-preview-container"),{
                reverse:false,  // 是否反转倾斜方向
                max:2,     // 最大的倾斜角度(度)
                startX:0,      // X轴上的起始倾斜,单位为度。
                startY:0,      // Y轴上的起始倾斜,单位为度。
                perspective:1000,   // 转换角度,越低倾斜越极端
                scale:1.02,      // 缩放比例,2 = 200%, 1.5 = 150%, 等等..
                speed:300,    // 进入/退出 过渡的速度
                transition:true,   // 是否在进入/退出的时候设置过渡效果
                axis:"y",   // 设置禁用哪个轴的反转,值为"x"或者"y"或者null
                reset:true,   // 设置在退出时清除倾斜效果
                easing:"cubic-bezier(.03,.98,.52,.99)",    // 设置进入退出时过渡的贝塞尔曲线
                glare:true,// 设置是否拥有炫光效果,即透明度渐变效果
                "max-glare":0.7,      // 设置最大的透明效果,1=100%,0.5=50%
                "glare-prerender":false,  // false, VanillaTilt为你创建透明炫光元素,否则你需要自己在.jstilt-glare>.js-tilt-glare-inner中自己添加render函数
                "mouse-event-element":null,   // css选择器或者链接到HTML的元素,他将监听该元素上的鼠标事件
                "full-page-listening":false,  // 是否监听整个页面的鼠标移动事件,若为true,他将监听这个页面,而非选中元素
                gyroscope:false,   // 是否开启陀螺仪的方向检测
                gyroscopeMinAngleX: 0,  //陀螺仪最小角度X
                gyroscopeMaxAngleX: 0,  //陀螺仪最大角度X
                gyroscopeMinAngleY: 0,  //陀螺仪最小角度
                gyroscopeMaxAngleY: 0,  //陀螺仪最大角度
                gyroscopeSamples: 10  //陀螺仪样品
            })
        }
        $(window.pjaxLoaded);
        $(document).on('pjax:end', window.pjaxLoaded);
    }
</script>
<!--鼠标悬停3D效果end-->对于Argon主题的使用者,这样就可以了!在Argon主题中,window.pjaxLoaded函数内的命令会避免使用Pjax并在切换页面时强制刷新,这个必须要用才可以保证特效的完美运行。如果是其它主题的话,你改一下控制对象的名字即可,具体情况具体分析。你也可以自己改动一下参数,看看效果如何。蛮有趣的一个特效!
鼠标文字特效
和雪花特效是一样的用法。在末尾</body>上方加入。当然a变量中的文字就自定义了!你可以改成自己喜欢的文字。
<!--鼠标特效开始-->
<script type="text/javascript">
var a_idx = 0;
jQuery(document).ready(function($) {
   $("body").click(function(e) {
       var a = new Array("❤富强❤", "❤民主❤", "❤文明❤", "❤和谐❤", "❤自由❤", "❤平等❤", "❤公正❤", "❤法治❤", "❤爱国❤", "❤敬业❤", "❤诚信❤", "❤友善❤");
       var $i = $("<span/>").text(a[a_idx]);
       a_idx = (a_idx + 1) % a.length;
       var x = e.pageX,
       y = e.pageY;
       $i.css({
           "z-index": 999999999999999999999999999999999999999999999999999999999999999999999,
           "top": y - 20,
           "left": x,
           "position": "absolute",
           "font-weight": "bold",
           "color": "#ff6651"
       });
       $("body").append($i);
       $i.animate({
           "top": y - 180,
           "opacity": 0
       },
       1500,
       function() {
           $i.remove();
       });
   });
});
</script>
<!--鼠标特效结束-->
鼠标指针特效1
效果大致如下图所示:
和雪花特效是一样的用法。在末尾</body>上方加入。
<!--鼠标样式:两个同心圆,大圆追小圆-->
<style type="text/css">
#cursor{position:fixed;width:16px;height:16px;background:#009688;border-radius:8px;opacity:0.25;z-index:10086;pointer-events:none;transition:0.2s ease-in-out;transition-property:background,opacity,transform}
#cursor.hidden{opacity:0}
#cursor.hover{opacity:0.1;transform:scale(2.5)}
#cursor.active{opacity:0.5;transform:scale(0.5)}
#clickME{cursor:pointer;display:inline-block;border:1px solid #009688}
</style>
<script src="https://fastly.jsdelivr.net/gh/huangwb8/bloghelper@latest/js/cursor_01.js"></script>
<!--鼠标样式结束-->
这个指针蛮帅的。但是,如果你想要选中某段文字复制粘贴,要考验一番眼力和手力。考虑到我自己用起来都有点困难,最后还是没有用它 ( ̄△ ̄;)
鼠标指针特效2
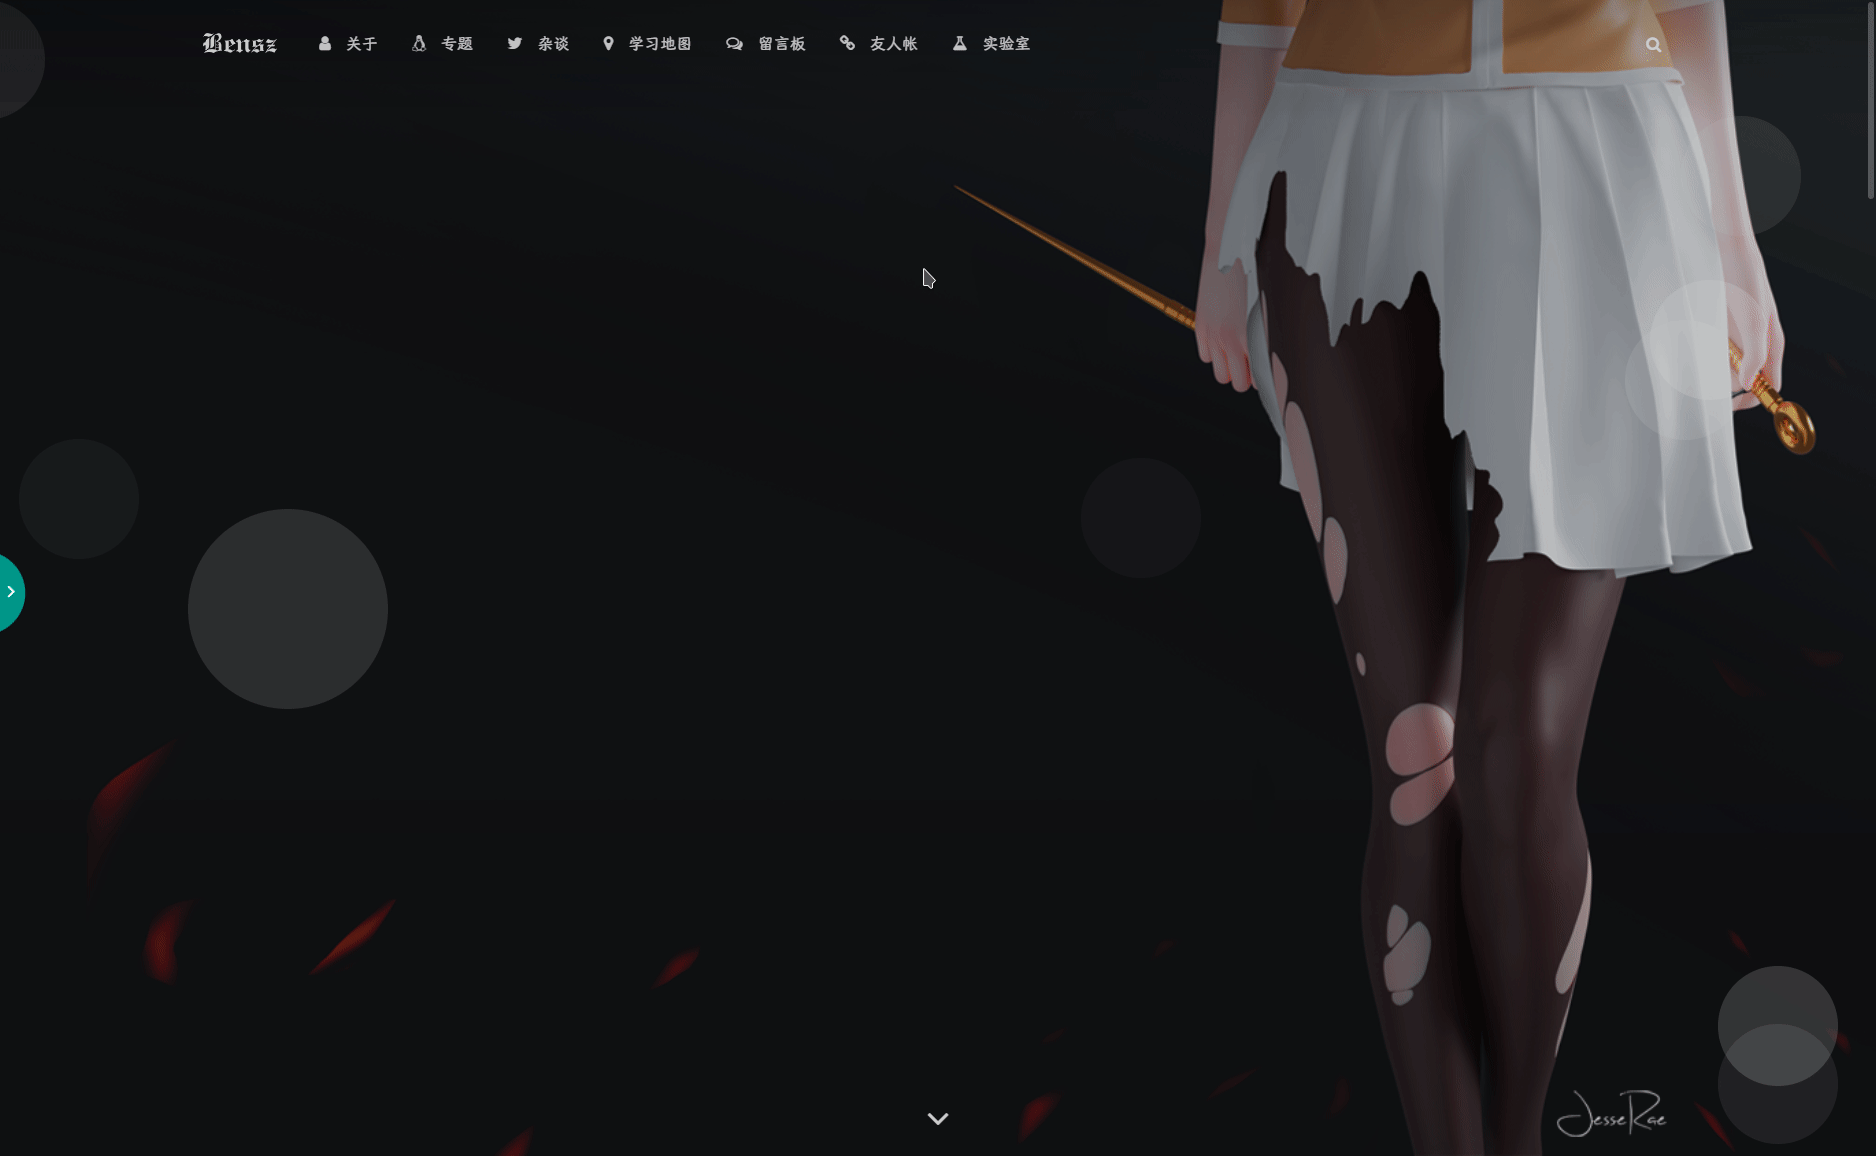
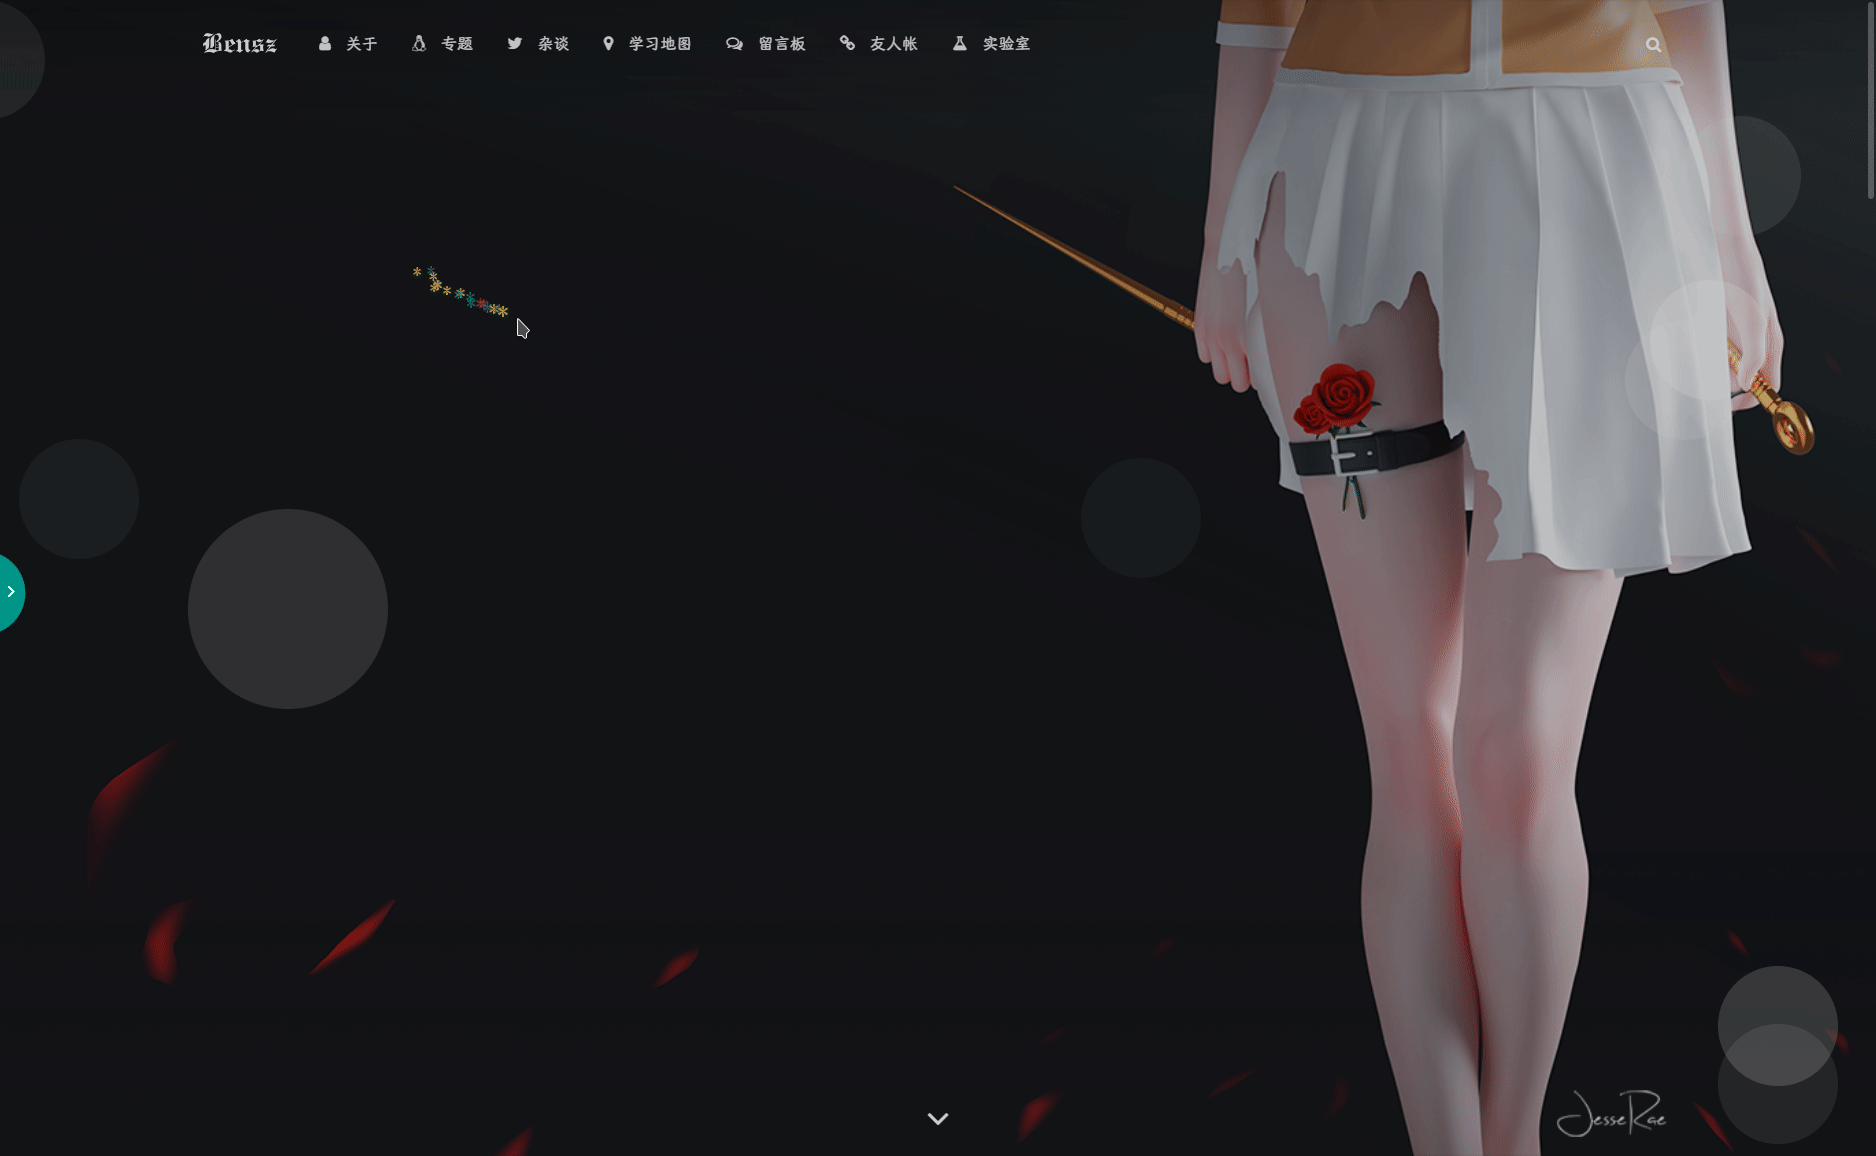
来源于halo的dream主题鼠标移动特效“仙女棒”,特效美观,自然:

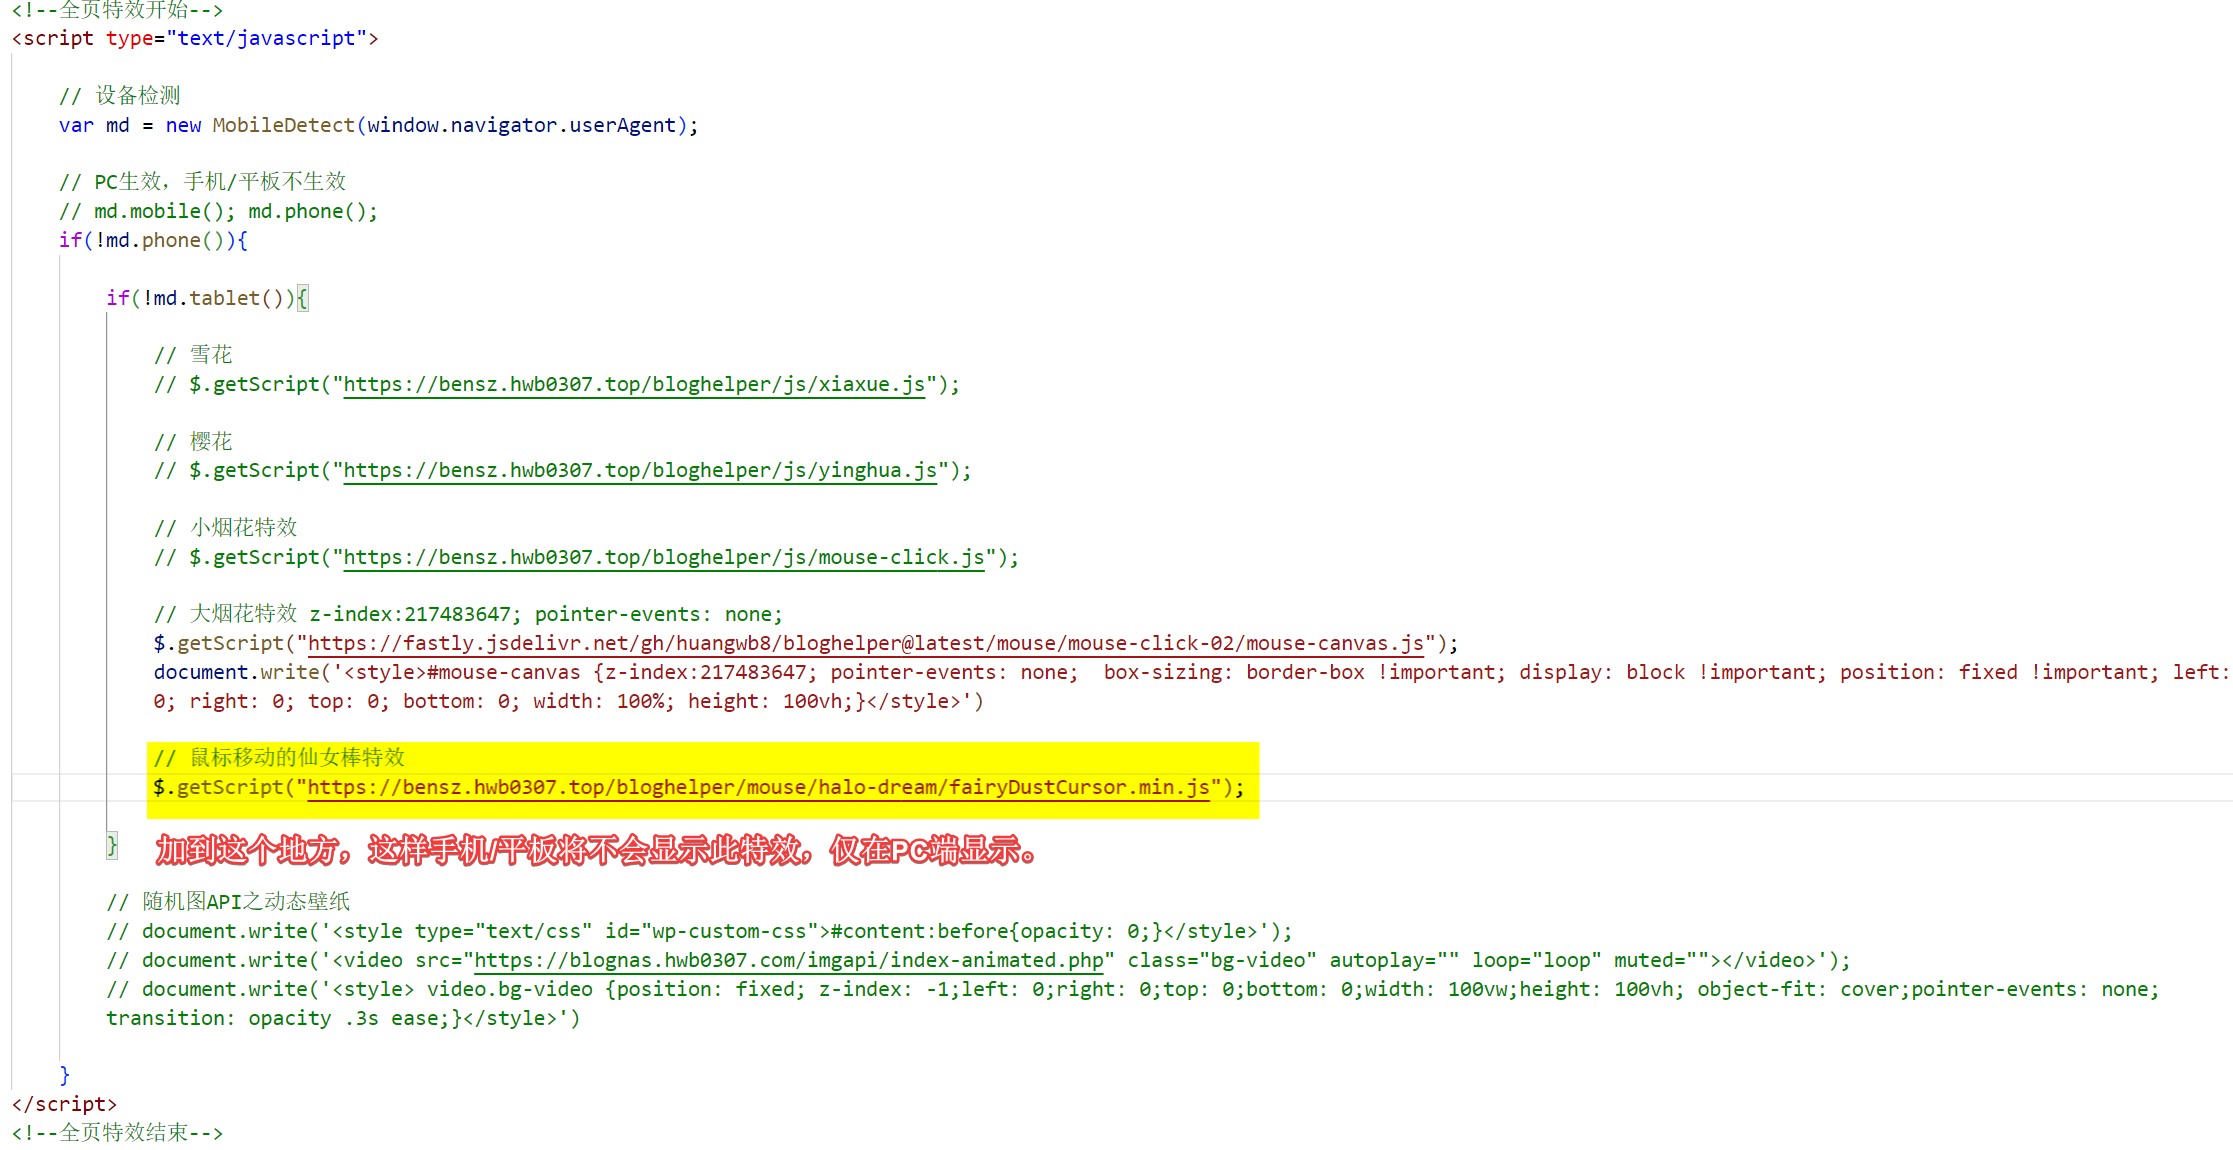
首先,在雪花/樱花特效里添加代码(保证只在PC端使用这个特效),它是仙女棒特效的来源,完全基于js生成,所以直接引用大佬们写好的脚本即可。将下列代码加到上面的雪花/樱花/烟花特效的JS框里:
// 鼠标移动的仙女棒特效。
$.getScript("https://fastly.jsdelivr.net/gh/huangwb8/bloghelper@latest/mouse/halo-dream/fairyDustCursor.min.js");
如图所示:
鼠标外观在footer.php里加入这个代码即可:
<!--鼠标指针特效2 开始-->
<style type="text/css">
.main-content img,body{cursor:url(https://fastly.jsdelivr.net/gh/huangwb8/bloghelper@latest/mouse/halo-dream/cursor/breeze/Arrow.cur),auto}.actions>div,.expand-done,.main-content figure>figcaption div,.navbar-above .navbar-nav .item,.navbar-searchicon,.navbar-slideicon,.photos .picture-details,.widget .ad-tag .click-close,a,button{cursor:url(https://fastly.jsdelivr.net/gh/huangwb8/bloghelper@latest/mouse/halo-dream/cursor/breeze/Hand.cur),auto}blockquote,code,h1,h2,h3,h4,h5,h6,hr,input[type=text],li,p,td,textarea,th{cursor:url(https://fastly.jsdelivr.net/gh/huangwb8/bloghelper@latest/mouse/halo-dream/cursor/breeze/IBeam.cur),auto}
</style>
<!--鼠标指针特效2 结束-->
文字输入撒花特效
主要参考突突的教程:https://wangwangyz.site/archives/1059
效果类似:
在末尾</body>上方加入代码:
<!--网站输入效果开始-->
<script src="https://fastly.jsdelivr.net/gh/huangwb8/bloghelper@latest/js/input-with-fire.js"></script>
网站标题可爱字符
主要参考likepoems大佬的网站。类似效果为:
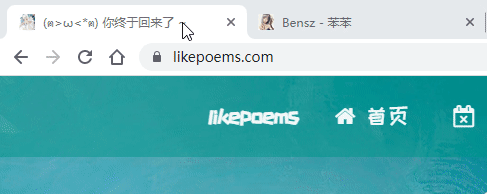
注意看左边的网站,它在退出/进入网站页面时,会有些可爱字符。
在末尾</body>上方加入代码:
<!--主题搞笑字符-->
<script>
$.getScript("https://fastly.jsdelivr.net/gh/huangwb8/bloghelper@latest/js/onfocus.js");
</script>
这个可爱字符有个坏处,就是访客查看关于你网站的浏览器历史记录时,全是表情。后来考虑到这个缺陷有点反人类,所以我还是撤除了。
看板娘
看板娘看上去很炫,但其实只有一段简单的代码。也是加在</body>之前,类似于:
<!--看板娘-->
<script src="https://fastly.jsdelivr.net/gh/huangwb8/live2d_bensz@latest/front/autoload.js"></script>你可看一下我托管在github上的代码:https://github.com/huangwb8/live2d_bensz。这个项目你可以作为一个参考。你要学习自定义看板娘,还是要在这些大佬的项目里仔细地查看文档:
默认情况下我已经放了很多看板娘进去了:
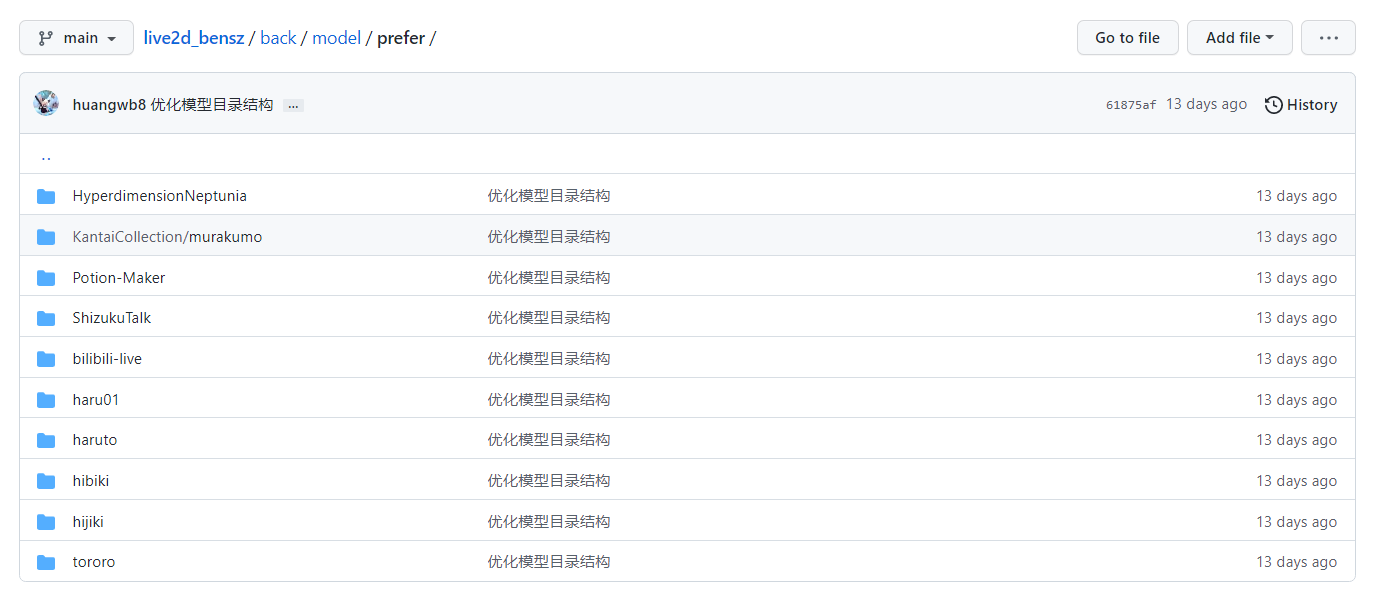
其中tororo是白猫,hijiki是黑猫。平时我一般也只是将tororo调用出来。这玩意看上去炫,其实你并不会特别地需要它的!
你想自定义的话,可以直接fork项目live2d_bensz,然后将other里的模型放到prefer,修改/back/model_list.json,并将每个model的*.model.json改名为index.json即可。CDN更新可能有点慢,可能要24小时。你可以去鸦鸦那里看教程,我也是学TA的:https://crowya.com/1092。如果你没有相关的编程知识,不推荐去折腾这个。直接粘贴完事。或者请个大佬来帮你折腾吧!
Argon主题点击概要也可以进入文章
在默认情况下,我们的文章只能通过点击标题(绿色框)进入。按这个设置后,你点击概要(红色框)也可以进入文章!
主要参考:https://wangwangyz.site/archives/835。这里我简单地贴一下大佬的教程吧,以防他的链接失效:

这一串代码是:
onclick="window.location.href='<?php the_permalink(); ?>'" style="cursor: pointer"字体
字体可以在字体天下、100font等网站里免费下载。通过转换网站获得woff2格式文件。你可以上传到网站根目录或者某个CDN里,然后添加下列额外CSS(具体方法见下):
/*设置网站字体*/
/*原则上你可以设置多个字体,然后在不同的部位使用不同的字体*/
@font-face{
    font-family:btfFont;
    src:
    url(https://fastly.jsdelivr.net/gh/huangwb8/bloghelper@latest/fonts/13.woff2) format('woff2')
}
body{
    font-family:"btfFont" !important
}这里展示所用的13.woff2是汉唐仪美人体,它并不是免费商用字体。个人博客毕竟是公开的,最好还是使用免费商用字体,以免未来有版权纠纷。你也可以在bloghelper里看看我之前找过的某些字体,都蛮漂亮的。下文的额外CSS也包含了字体设置,多加注意。
Github卡片
可能仅适用于Argon主题。
在额外CSS中添加:
/* Github卡片样式*/
.github-info-card-header a {
    /*Github卡片抬头颜色*/
    color: black !important;
    font-size: 1.5rem;
}
.github-info-card {
    /*Github卡片文字(非链接)*/
    font-size: 1rem;
    color: black !important;
}
.github-info-card.github-info-card-full.card.shadow-sm {
    /*Github卡片背景色*/
    background-color: rgba(var(--themecolor-rgbstr), 0.1) !important;
}
小工具:时间进度条
仅限argon主题。
效果如下:
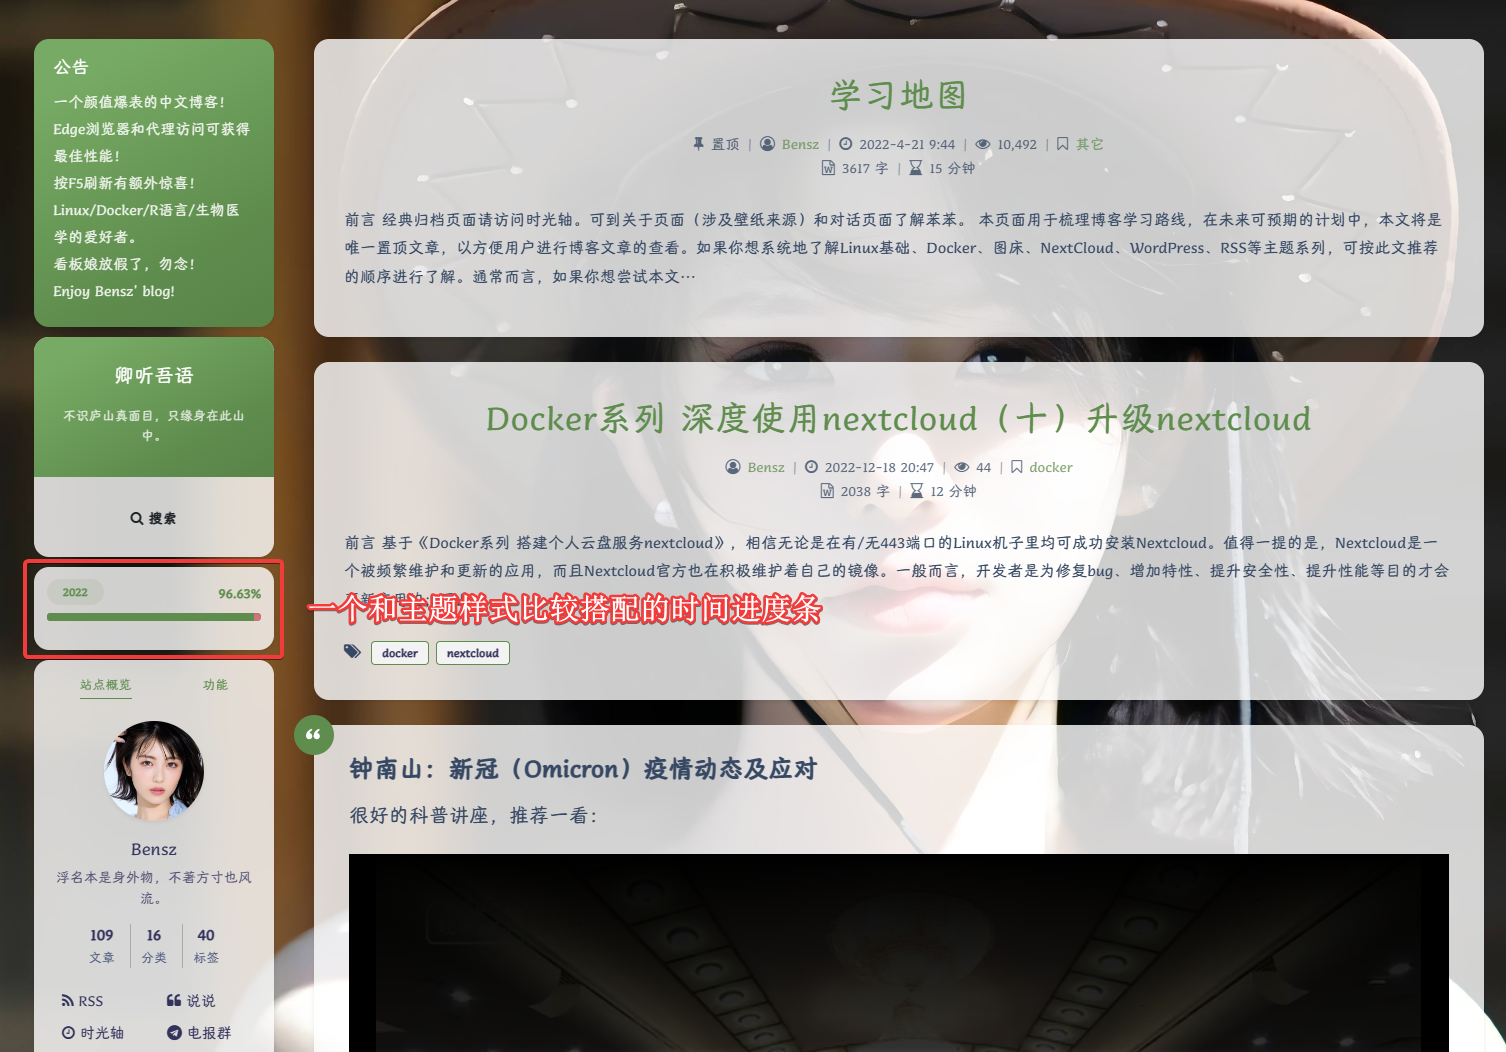
大致原理是基于html/css/js定义一个时间进度条b。然后,将b插入到sidebar.php的id="leftbar_part2"前面,从而实现在左侧栏的目标位置(站点概览的窗口上方)植入b。
具体做法如下:
- 下载
progress-wrapper.php文件。下载地址:Alist; Github。 - 将
progress-wrapper.php保存在WordPress根目录下的某个位置。比如,我放的位置是./specialEffects/progress-wrapper.php。 - 在主题编辑器中找到
sidebar.php文件。 - 在
sidebar.php的<div id="leftbar_part2" class="widget widget_search card bg-white shadow-sm border-0">标签前引用命令:<?php require('./specialEffects/progress-wrapper.php'); ?>,如图所示:

其中,./specialEffects/progress-wrapper.php是我实际使用的路径,请根据实际情况修改。
此外,progress-wrapper.php中有一些重要的参数,可根据实际情况自定义。详见下图:
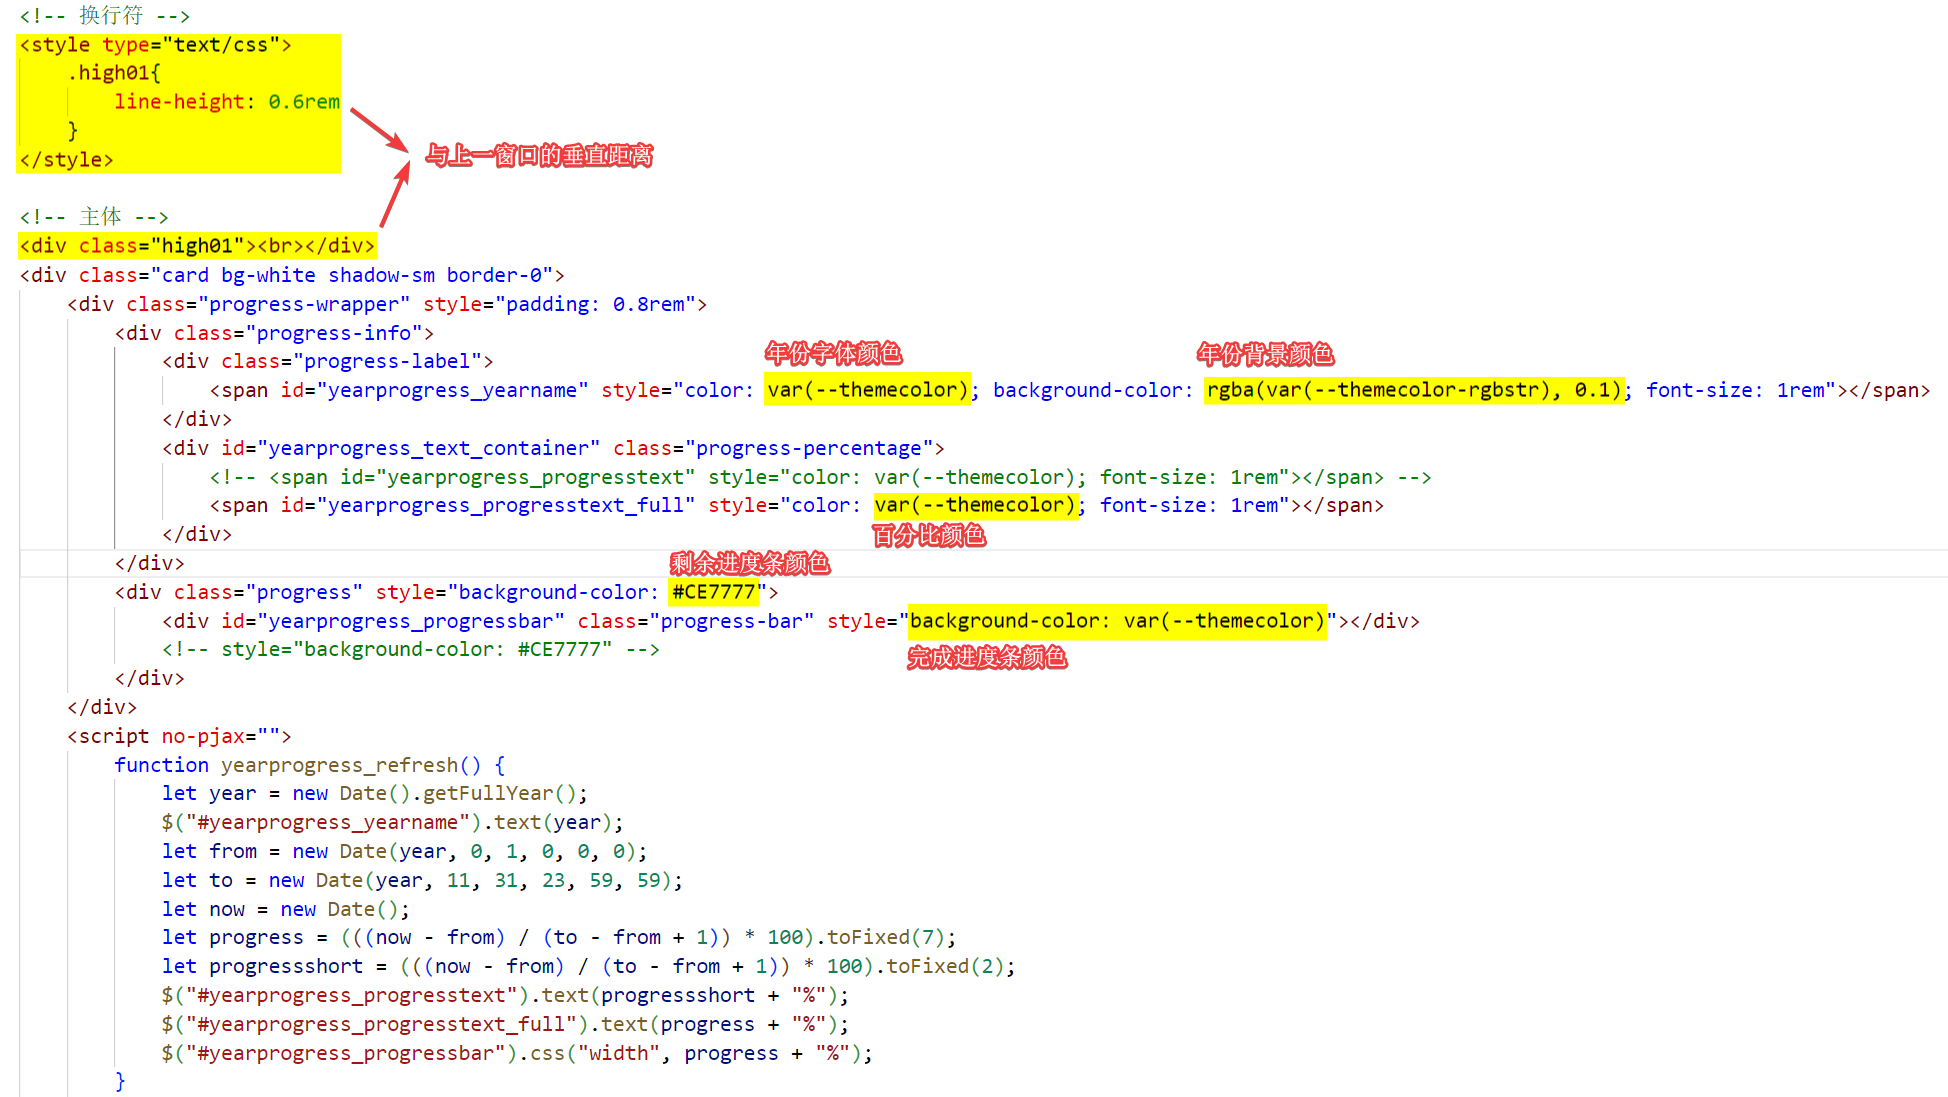
百分比有2种模式,一种是yearprogress_progresstext,另一种是yearprogress_progresstext_full。full会返回一个更加精确的数字:
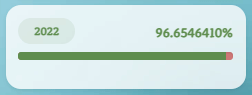
这个模式效果也不错 (☆ω☆) (☆ω☆) (☆ω☆)。
代码已经给出,大家根据需要也可以自定义,这里不再赘述。总体上,时间进度条小工具的添加和修改并不复杂。请试试看!
额外CSS
额外CSS一般用于增加一些自定义样式,比较改大某些字体的属性(大小、颜色)。这里修改的好处就是主题切换、升级时,该设置也不会丢失。
如果你想自定义CSS,最好通过Chrome/Edge浏览器+F12键探索一下。下面的内容部分参考了鸦鸦的Argon 主题修改记录,我还进行了一些增删。有这些CSS加持,整个主题视觉效果好得多!
我们可以从后台左侧栏的外观——自定义,找到额外CSS:
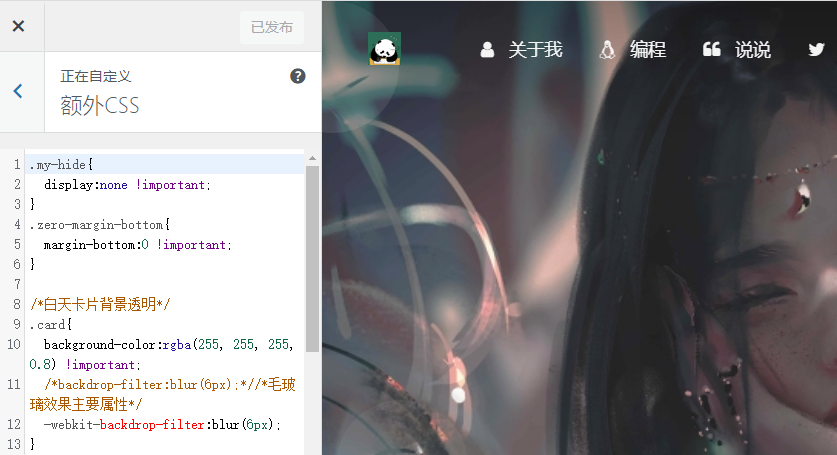
在左下方空白处填写(按需增删):
/*=========字体设置============*/

/*网站字体*/
/*原则上你可以设置多个字体,然后在不同的部位使用不同的字体。*/
@font-face{
    font-family:btfFont;
    src:
    url(https://fastly.jsdelivr.net/gh/huangwb8/bloghelper@latest/fonts/13.woff2) format('woff2')
}
body{
    font-family:"btfFont" !important
}

/*横幅字体大小*/
.banner-title {
  font-size: 2.5em;
}
.banner-subtitle{
  font-size: 20px;
}

/*文章标题字体大小*/
.post-title {
    font-size: 30px
}

/*正文字体大小(不包含代码)*/
.post-content p{
    font-size: 1.25rem;
}
li{
    font-size: 1.2rem;
}

/*评论区字体大小*/
p {
    font-size: 1.2rem
}

/*评论发送区字体大小*/
.form-control{
    font-size: 1.2rem
}

/*评论勾选项目字体大小*/
.custom-checkbox .custom-control-input~.custom-control-label{
    font-size: 1.2rem
}
/*评论区代码的强调色*/
code {
  color: rgba(var(--themecolor-rgbstr));
}

/*说说字体大小和颜色设置*/
.shuoshuo-title {
    font-size: 25px;
/*  color: rgba(var(--themecolor-rgbstr)); */
}

/*尾注字体大小*/
.additional-content-after-post{
    font-size: 1.2rem
}

/*========颜色设置===========*/

/*文章或页面的正文颜色*/
body{
    color:#364863
}

/*引文属性设置*/
blockquote {
    /*添加弱主题色为背景色*/
    background: rgba(var(--themecolor-rgbstr), 0.1) !important;
    width: 100%
}

/*引文颜色 建议用主题色*/
:root {
    /*也可以用类似于--color-border-on-foreground-deeper: #009688;这样的命令*/
    --color-border-on-foreground-deeper: rgba(var(--themecolor-rgbstr));
}

/*左侧菜单栏突出颜色修改*/
.leftbar-menu-item > a:hover, .leftbar-menu-item.current > a{
    background-color: #f9f9f980;
}

/*站点概览分隔线颜色修改*/
.site-state-item{
    border-left: 1px solid #aaa;
}
.site-friend-links-title {
    border-top: 1px dotted #aaa;
}
#leftbar_tab_tools ul li {
    padding-top: 3px;
    padding-bottom: 3px;
    border-bottom:none;
}
html.darkmode #leftbar_tab_tools ul li {
    border-bottom:none;
}

/*左侧栏搜索框的颜色*/
button#leftbar_search_container {
    background-color: transparent;
}

/*========透明设置===========*/

/*白天卡片背景透明*/
.card{
    background-color:rgba(255, 255, 255, 0.8) !important;
    /*backdrop-filter:blur(6px);*//*毛玻璃效果主要属性*/
    -webkit-backdrop-filter:blur(6px);
}

/*小工具栏背景完全透明*/
/*小工具栏是card的子元素,如果用同一个透明度会叠加变色,故改为完全透明*/
.card .widget,.darkmode .card .widget,#post_content > div > div > div.argon-timeline-card.card.bg-gradient-secondary.archive-timeline-title{
    background-color:#ffffff00 !important;
    backdrop-filter:none;
    -webkit-backdrop-filter:none;
}
.emotion-keyboard,#fabtn_blog_settings_popup{
    background-color:rgba(255, 255, 255, 0.95) !important;
}

/*分类卡片透明*/
.bg-gradient-secondary{
    background:rgba(255, 255, 255, 0.1) !important;
    backdrop-filter: blur(10px);
    -webkit-backdrop-filter:blur(10px);
}

/*夜间透明*/
html.darkmode.bg-white,html.darkmode .card,html.darkmode #footer{
    background:rgba(66, 66, 66, 0.9) !important;
}
html.darkmode #fabtn_blog_settings_popup{
    background:rgba(66, 66, 66, 0.95) !important;
}

/*标签背景
.post-meta-detail-tag {
    background:rgba(255, 255, 255, 0.5)!important;
}*/


/*========排版设置===========*/

/*左侧栏层级置于上层*/
#leftbar_part1 {
    z-index: 1;
}

/*分类卡片文本居中*/
#content > div.page-information-card-container > div > div{
    text-align:center;
}

/*子菜单对齐及样式调整*/
.dropdown-menu .dropdown-item>i{
    width: 10px;
}
.dropdown-menu>a {
    color:var(--themecolor);
}
.dropdown-menu{
    min-width:max-content;
}
.dropdown-menu .dropdown-item {
    padding: .5rem 1.5rem 0.5rem 1rem;
}
.leftbar-menu-subitem{
    min-width:max-content;
}
.leftbar-menu-subitem .leftbar-menu-item>a{
    padding: 0rem 1.5rem 0rem 1rem;
}

/*左侧栏边距修改*/
.tab-content{
    padding:10px 0px 0px 0px !important;
}
.site-author-links{
    padding:0px 0px 0px 10px ;
}
/*目录位置偏移修改*/
#leftbar_catalog{
    margin-left: 0px;
}
/*目录条目边距修改*/
#leftbar_catalog .index-link{
    padding: 4px 4px 4px 4px;
}
/*左侧栏小工具栏字体缩小*/
#leftbar_tab_tools{
    font-size: 14px;
}

/*正文图片边距修改*/
article figure {margin:0;}
/*正文图片居中显示*/
.fancybox-wrapper {
    margin: auto;
}
/*正文表格样式修改*/
article table > tbody > tr > td,
article table > tbody > tr > th,
article table > tfoot > tr > td,
article table > tfoot > tr > th,
article table > thead > tr > td,
article table > thead > tr > th{
    padding: 8px 10px;
    border: 1px solid;
}
/*表格居中样式*/
.wp-block-table.aligncenter{margin:10px auto;}

/*回顶图标放大*/
button#fabtn_back_to_top, button#fabtn_go_to_comment, button#fabtn_toggle_blog_settings_popup, button#fabtn_toggle_sides, button#fabtn_open_sidebar{
    font-size: 1.2rem;
}

/*顶栏菜单放大*/
/*这里也可以设置刚刚我们设置的btfFont字体。试试看!*/
.navbar-nav .nav-link {
    font-size: 1rem;
    /*font-family: 'btfFont';*/
}
.navbar-brand {
    font-family: 'Noto Serif SC',serif;
    font-size: 1.25rem;
    margin-right: 2rem;
    padding-bottom: .2rem;
}
.nav-link-inner--text {
    font-size: 1.1rem;
}
.navbar-nav .nav-item {
    margin-right:0;
}
.mr-lg-5, .mx-lg-5 {
    margin-right:1rem !important;
}
.navbar-toggler-icon {
    width: 1.5rem;
    height: 1.5rem;
}
.navbar-expand-lg .navbar-nav .nav-link {
    padding-right: 0.9rem;
    padding-left: 1rem;
}

/*隐藏wp-SEO插件带来的线条阴影(不一定要装)*/
*[style='position: relative; z-index: 99998;'] {
    display: none;
}
如果你不太懂某一项的意义,可以评论区留言咨询,有空我会解答!
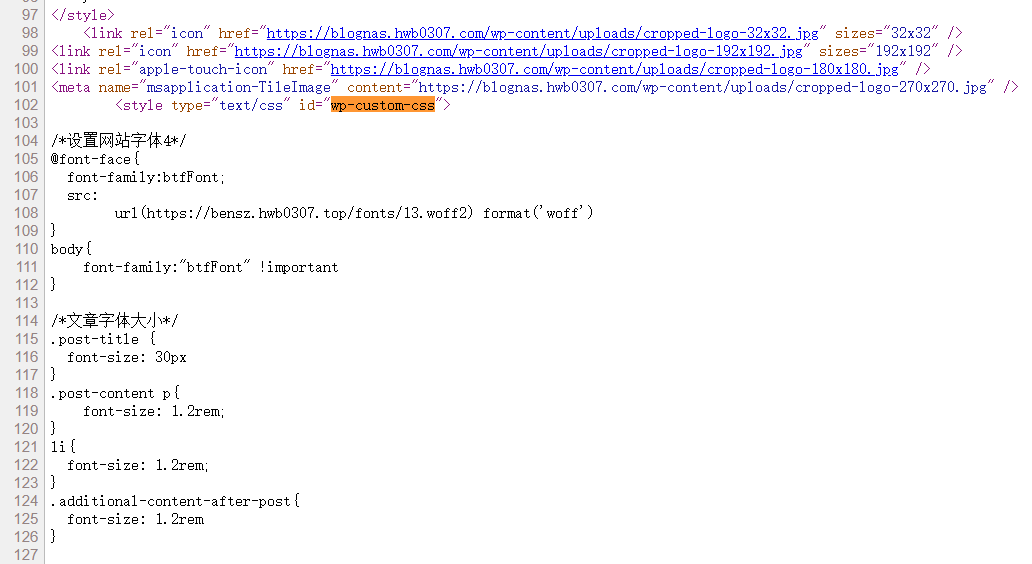
如果你对我正在使用的额外CSS感兴趣,也可以直接查看我博客网页的源代码,搜索wp-custom-css即可快速定位:
font awesome v6
v6有一些特别的图标。在footer.php里添加以下css:
<link rel="stylesheet" href="https://cdnjs.cloudflare.com/ajax/libs/font-awesome/6.2.0/css/fontawesome.min.css">在这里搜索图标:https://fontawesome.com/search。与v4版本相比有很多新的图标。
悼念色
遇到国家重要人物逝世、抗战纪念日等重大时点,为了表示悲悼,很多网站会选择全黑白的配色。效果如下:

只需要在额外CSS的最底部(否则容易和其它CSS代码冲突)添加下列代码即可:
/*网站黑白色(悼念)*/
html {
    filter: grayscale(100%);
    -webkit-filter: grayscale(100%);
    -moz-filter: grayscale(100%);
    -ms-filter: grayscale(100%);
    -o-filter: grayscale(100%);
    filter: url("data:image/svg+xml;utf8,#grayscale");
    filter:progid:DXImageTransform.Microsoft.BasicImage(grayscale=1);
    -webkit-filter: grayscale(1);
}
该CSS代码对于任何WordPress主题都是适用的。
春节灯笼挂件
效果大致如下:

方法一:在footer.php的</body>标签前加入下列HTML代码:
<!--春节灯笼-->
<link href="https://fastly.jsdelivr.net/gh/huangwb8/bloghelper@latest/css/deng.css" rel="stylesheet">
<div class="deng-box">
<div class="deng">
<div class="xian"></div>
<div class="deng-a">
<div class="deng-b"><div class="deng-t">春节</div></div>
</div>
<div class="shui shui-a"><div class="shui-c"></div><div class="shui-b"></div></div>
</div>
</div>

<div class="deng-box1">
<div class="deng">
<div class="xian"></div>
<div class="deng-a">
<div class="deng-b"><div class="deng-t">快乐</div></div>
</div>
<div class="shui shui-a"><div class="shui-c"></div><div class="shui-b"></div></div>
</div>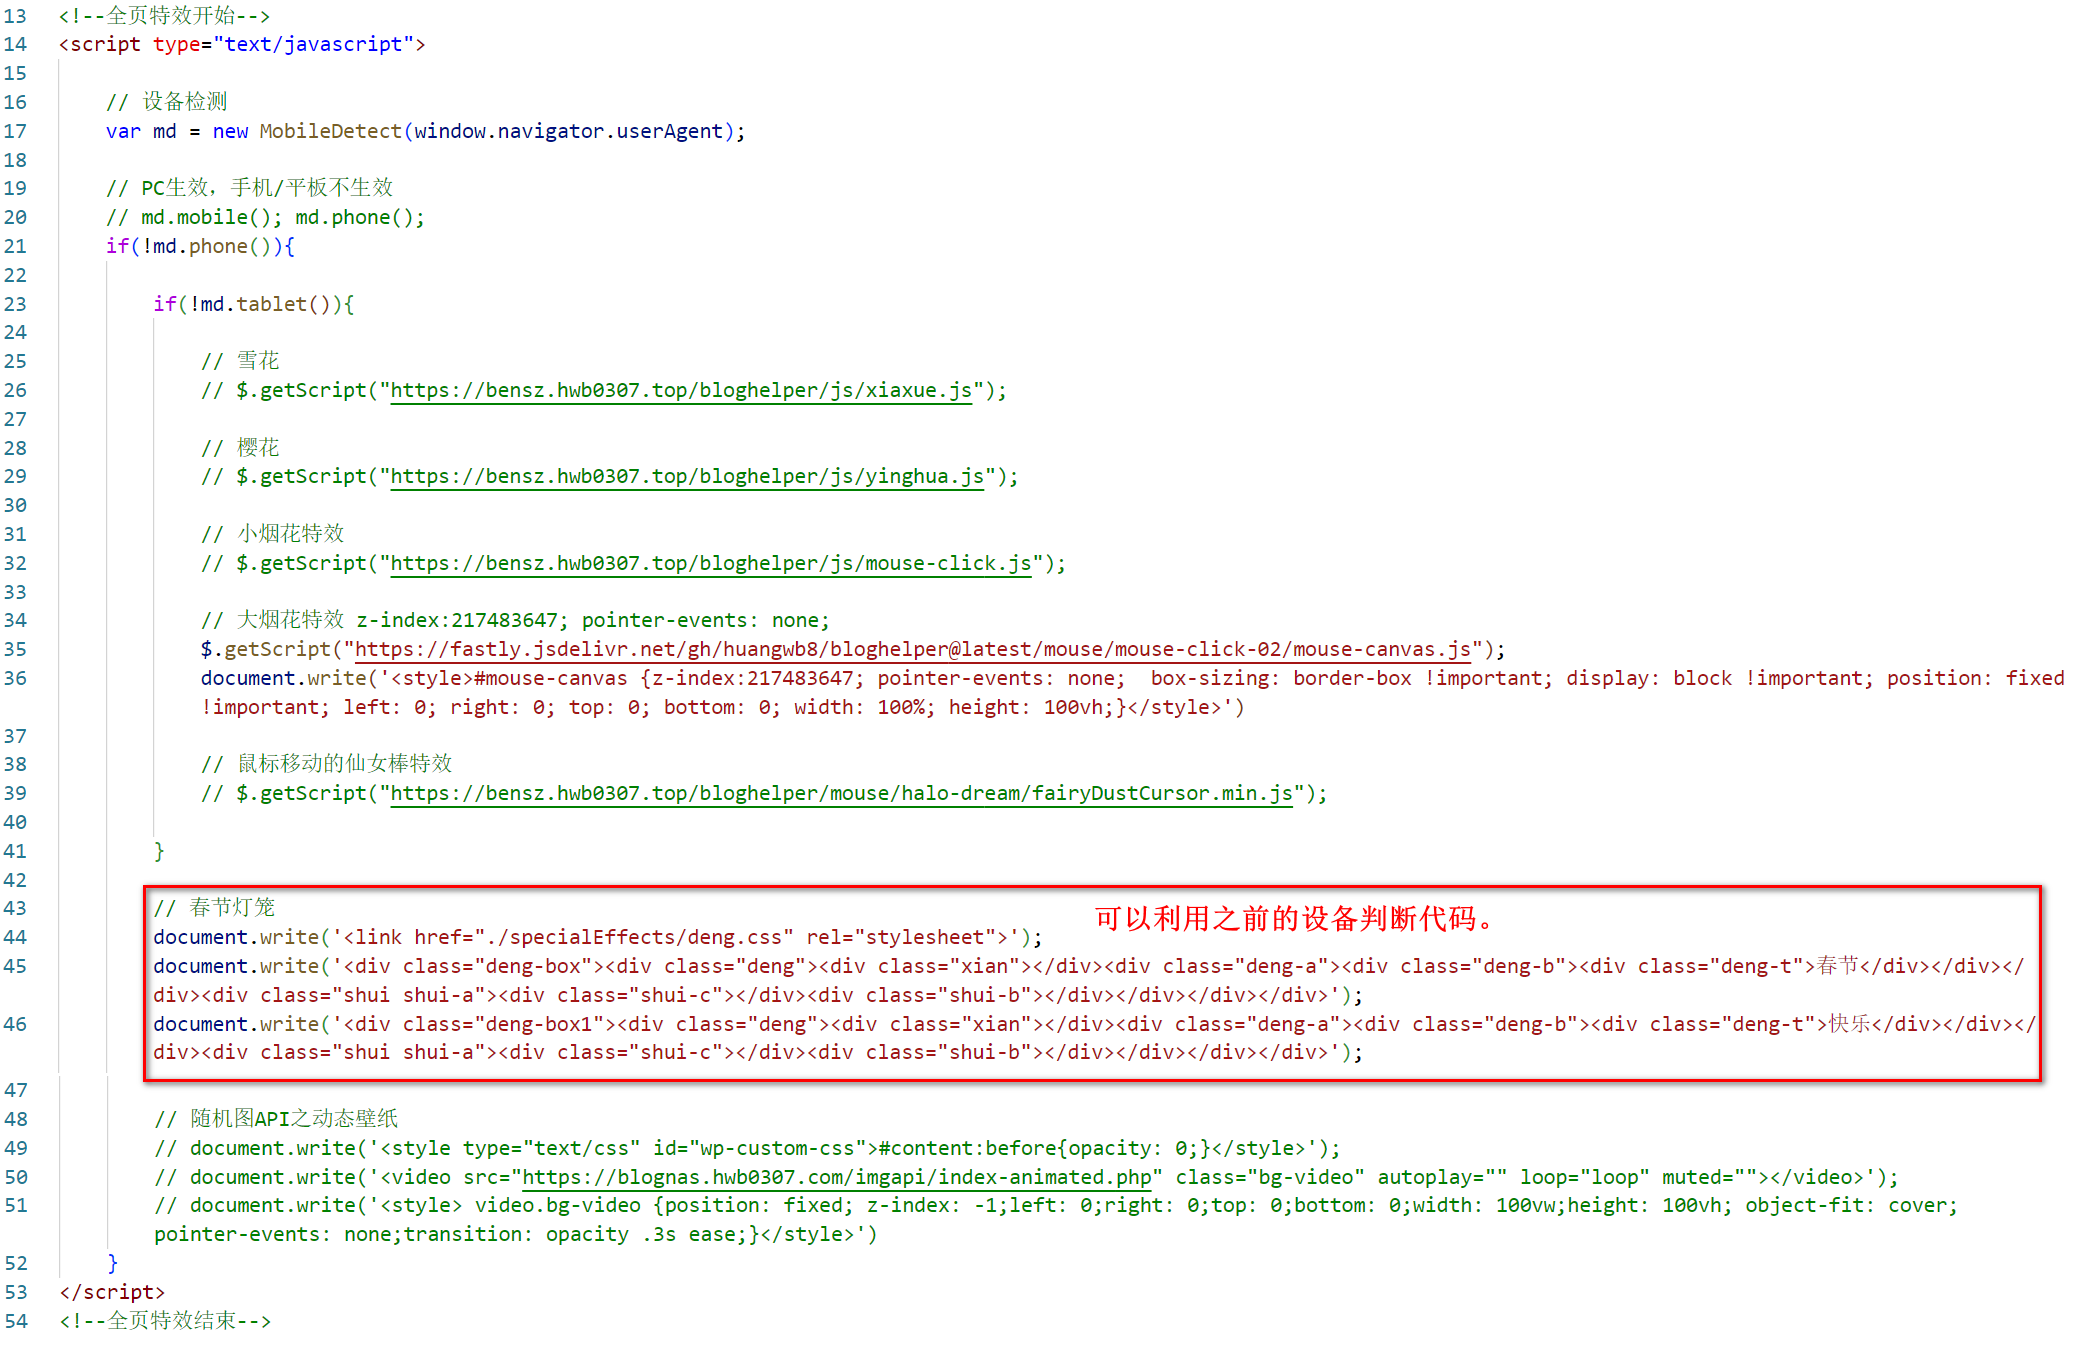
</div>方法二:像我一样,为了利用js的设备判断,在js中加入代码:
// 春节灯笼
document.write('<link href="https://fastly.jsdelivr.net/gh/huangwb8/bloghelper@latest/css/deng.css" rel="stylesheet">');
document.write('<div class="deng-box"><div class="deng"><div class="xian"></div><div class="deng-a"><div class="deng-b"><div class="deng-t">春节</div></div></div><div class="shui shui-a"><div class="shui-c"></div><div class="shui-b"></div></div></div></div>');
document.write('<div class="deng-box1"><div class="deng"><div class="xian"></div><div class="deng-a"><div class="deng-b"><div class="deng-t">快乐</div></div></div><div class="shui shui-a"><div class="shui-c"></div><div class="shui-b"></div></div></div></div>');
如下图所示:
小结
特效我暂时接触就是这些了。已经是很花里胡哨了!
更多特效(比如设置网页源码无法观看等)你自己检索吧!我自己就没有这些需求了。如果你只是搬运别人的特效,无非就是粘贴一些js/css在footer.php/额外CSS里。如果你要自定义特效,这我也没太多经验,看板娘还懂一些。我自己在一个全新的博客里测试过这些代码,均可以成功使用。如果你有问题,评论区留言吧!
博客版面和美化的相关设置,我觉得说到这里就差不多了。我觉得Argon主题的设置并不是很复杂。如果你有更加深入或细化的要求,就要靠你自己摸索了!反正我是不想在上面花太多心思了。
点击右侧栏文章目录的H2标题,以为会页面转到指定页面位置,点击了几个H2标题,但是没有任何反应,不知道是不是鼠标点击特效造成的。
其实不是,我也早就发现了这个问题。现在使用主题Gutenberg区块下的小标题就不会出问题。写这篇文章时BUG还未修复,没用那个区块,所以不行,去
这篇文章下看就好了。
sorry,最新版本已经修复了Bug